Showing posts with label how to. Show all posts

Sunday, April 9, 2017

Making Your First Dress - A Lesson from 1927


I just keep finding things inside of my Woman's Institute lesson books! This time I was looking through Dressmaking - Perfection in Details and this flyer was tucked in the back.
It was most likely included in the mail order coursework as part of the Dressmaking Program.

It mentions a few commercial patterns that one could purchase to make these looks including Ladies' Home Journal 5146, Butterick 1390, Butterick 1561, Pictorial Review 4006, and Ladies' Home Journal 5503.

Enjoy!


Oh, and in other news, look what I just finished!

#3069 Slip Pattern

Wednesday, March 29, 2017

Making a Kimono Sleeve Dress from the Woman's Institute

This morning I was gently riffling through my Woman's Institute book collection and inside a copy of Dress Construction and Finishing I found the coolest little booklet!

It was meant to come along with actual fabric dress pieces sent to the student to sew, and then return for examination! Can you just image getting a dress in the mail, already cut, just waiting to be sewn together? How fun!

For those of you unfamiliar with it, the Woman's Institute was a dressmaking and millinery instruction school that operated mainly by correspondence.

You can read all about their courses and book in a few different publications including Dressmaking Made Easy, Home Study Courses, and What the Woman's Institute Means to Me.

For your enjoyment, here is the lesson booklet in its entirety.


You can make a dress similar to this by using a straight-line one-piece dress pattern.


Sunday, November 15, 2015

1940' Bra Sew-Along - Finishing with a closure.


Hello my dears. I hope you're having a lovely weekend so far.
I just want to start this post out today with a warm hug for my friends and followers in France. Your country was my first love and my oldest friend, and after the events of yesterday, you are in my thoughts and prayers.

It's a chilly day here in Monterey and the sun is at a low angle in the sky. My house smells like a house should on a cold day - hints of apple cider and a pot roast in the oven are wafting up the stairs to my studio. And it's the perfect time to type up a blog post and finish our sew-along.

In our last post we discussed edge finishing and sewing our straps in. Now all that's left to do is add our back closure and we should be done! I know we're all used to hook and eye closures in bras these days and that's what I prefer for this bra. But if you're going for a full 1940's bra style, know that you can also use buttons and loops if you like, or a French bra back, which is essentially two lengths of elastic and a hook.

For this project I have used plush-backed hook and eye tape with a double set of eyes for adjusting fit. This is pretty much plug and play, but there are a few notes on placement.

The first thing to do no matter what type of closure you use, is to stay-stitch the center back of each piece D to keep it from stretching while you work. This can be done with any straight stitch 1/8" from the edge.


Thursday, November 12, 2015

1940's Bra Sew-Along - Finishing edges and adding straps.


Hello again my dears,
In our last sew-along post, we sewed our actual bra pieces together and now we're ready to talk edge finishing. We'll need to do this before we before can sew our straps in place. There are a few ways that you can finish your edges if you're not sewing a whole bra and lining together and turning it right sides out. You can bind your edges, add applique lace at the edges, or my favorite, face the edges with rayon or cotton seam tape.

This is easy as pie and makes a nice, neat finished edge on both sides.
First lay your chosen tape (I like 1/2" wide rayon seam binding) on the top edge of the RIGHT side of the bra. Pin it in place and stitch 1/8" from the top edge.


Now press the tape upwards. This will give you a crisp edge later on. After that, fold the tape over onto the WRONG side of the bra edge and press again.

Saturday, August 29, 2015

A Vintage Brassiere in Profile... 1940's Bra by Siva of Paris

Hello lovely readers. Recently, I've been working on grading a few of my 1940's bra patterns into larger sizes. While doing this, I tested a few for fit and accuracy by sewing a few samples and became SO inspired to sew more lingerie again! In a fit of passion, I pulled all of my vintage brassieres out to study their construction and was again delighted to see the interesting details that these little beauties featured.

If you ever decide to try your had at some historically accurate bra sewing, here a few details you might like to try!


This little bra by Siva of Paris is from the late 1930's to early 1940's. The fabric is a satin coutil, a wonderful, but very hard-to-find piece of fabric for lingerie sewing. If you can't find coutil, a great substitute is to buy a very lightweight satin and baste it to a soft cotton lawn or fine muslin. This has worked wonders for some of my bra sewing projects.

The closure is one of my favorite types, and adjustable length of elastic (with mini buttonholes!) with a hook. These are incredibly comfortable and are still my favorite way to finish the back of a bra.


Saturday, February 14, 2015

Dressmaking: Modish Draperies, Flounces and Panels from 1928


Today, my dear readers, I have a real treat. From Fashion Service of 1928, I bring you lessons in draping flounces and panels! This is a fantastic technique that you can use in both historical dressmaking as well as modern. It's a wonderful way to personalize a basic pattern with your own flare. In the examples that follow, picture playing with contrasting fabrics, the combination of prints and solids, or added panels of lace for a more luxurious look.

Without further ado, here is the original article:


The ease with which the modish draperies of the season may be achieved is here illustrated. On a foundation dress that may be new or one of a previous season that you wish to refurbish, straight lengths of material are draped in smart but simple ways to produce the soft, fluttering effects so prominent in the feminine mode that sponsors the "dressmaker" type of dress.

To drape effectively, use soft muslin for trial material and plenty of pins. Follow the diagrams accurately and always mark the center front and center back. When the drape runs over the waist line, cut out slightly as shown.
Finish the edges of the dress fabric with picoting, binding, facing. or tiny rolled hems, as the effect may require, having first determined the size in muslin.

Rippling Cascade Panel - Picture adding this in a bright, contrasting color...

Handkerchief Drapes - Imagine these in alternating colors...

Hip Flounces - These would be a good way to add a bit of length to a dress that's a bit too short!

Minaret Flounces - You could add these if you have a narrow figure to add the illusion of fuller hips.

Diagonal Side Drape - Did you get a wine stain on the skirt of your dress? A diagonal drape is a great way to save the dress if the stain won't come out!

We briefly explored draping in my most recent pattern drafting class and I became quite interested in the topic. I found that since the class didn't expound as much as I would have liked (due to time constraints) that my collection of Fashion Service magazines were actually a rather useful supplement.


I had one very fun draping assignment in the class - draping around a motif shape - that led to some fun experimenting that I would love to explore further some day... maybe for the next Air Force ball (she said wistfully, knowing that her husband has begged not to be dragged to any more of them...).

Oh, and in other news, I'm delighted to announce that one of my longest running patterns, Depew #3007 Draped French Blouse, is now available in multiple sizes (including 34"-41" bust sizes) in both paper and digital forms!

Available in both digital and paper versions at MrsDepew.com.

How about you? Have you ever done any draping? Do you have any favorite draping books or resources that I might enjoy obsessing over?

Happy sewing,


Tuesday, October 14, 2014

How to Draft a Trousers Pattern - A Tutorial


Hello my dear readers,
This month I have really had trousers on my mind. A trip to Banana Republic where everything was lovely, expensive, and way too short for my long legs had me thinking, "I can make this! Why would I pay $100 for something that just won't quite fit right?"

I always do this. I call it the seamless loop. I want a garment, but it's expensive and I could make it if only I could make the time, which gets me thinking about how much my time is worth, how busy I am, and that I technically make enough money to treat myself to a lovely thing like that once in a blue moon. But I just can't justify buying it, knowing that I could make a better-fitting one... and it all goes through my mind for long enough that I get sick of it all and before I know it, I'm cranky, frustrated, and without either a purchased or handmade version of what I wanted in the first place. Have you ever done this? It sucks!
So I decided to break the cycle. I am drafting a few patterns to test out the fit, length, waist rise etc. until I have the perfect pair. 


I also decided that I would create a tutorial here in case any of you might like to try trouser drafting for yourselves!
Here's what you'll need:

Paper, long enough for your high waist to floor measurement plus a few inches more, and wide enough for 1/2 your hip measurement plus a few more inches. (a nice, 36" wide roll does nicely!)
Pencil,
Eraser,
Rulers, including yardstick or a tailors' square if you can get one.
A French curve, hip curve or other curve drafting tool.

And of course, you'll need your measurements! This tutorial is adapted from a 1940's/ 1950's trouser so you'll want to pay attention to your vintage sizing.


And now for how it's done!


I. - See illustration above.

A to B - Equals side length measurement.
A to C - Equals 6 3/4” for size 12
              6 7/8” for size 14
              7” for size 16 and up...

C to D - Equals 1/4 of hip measurement plus 3/4” for ease. Square this line across at C.
C to E - Same length as C to D. Extend line D-C to E; then pivoting at D, draw an arc line above E.
A to F - Equals crotch depth measurement plus 1” for ease. Mark point F on line A-B.
G to H - Equals hip line D-E. Draw this line through F, parallel to hip line D-E.
G to I - Square this line up at G through D, making this line 1/2” less than A to F.
H to J - Equals 1/2 of line F to H. Extend line G-H to J.
H to K - Equals 1/2 of line H to J.
K to L - Equals line G-I (center front) plus 2” for center back line. Draw this line from K to L, touching the outer most curve of arc line.
G to M - Equals length from K to J.
G to N - Equals 1 1/2”. Draw a diagonal line; then draw a curved line from D to M through N.
K to O - Equals 1 1/4”. Draw a curved line through O.
G to P - Equals length of F to B. Square a line down at G.
K to Q - Equals length of F to B. Square a line down at K.
P to Q - Connect for lower edge.
P to R - Equals 1/2 of line P to D.
R to S - Square a line across at R for knee line; then draw slightly curved lines from M to R and J to S for inner leg seam.
B to T - Equals 1”.
T to C - Connect.


II. - See illustration above.
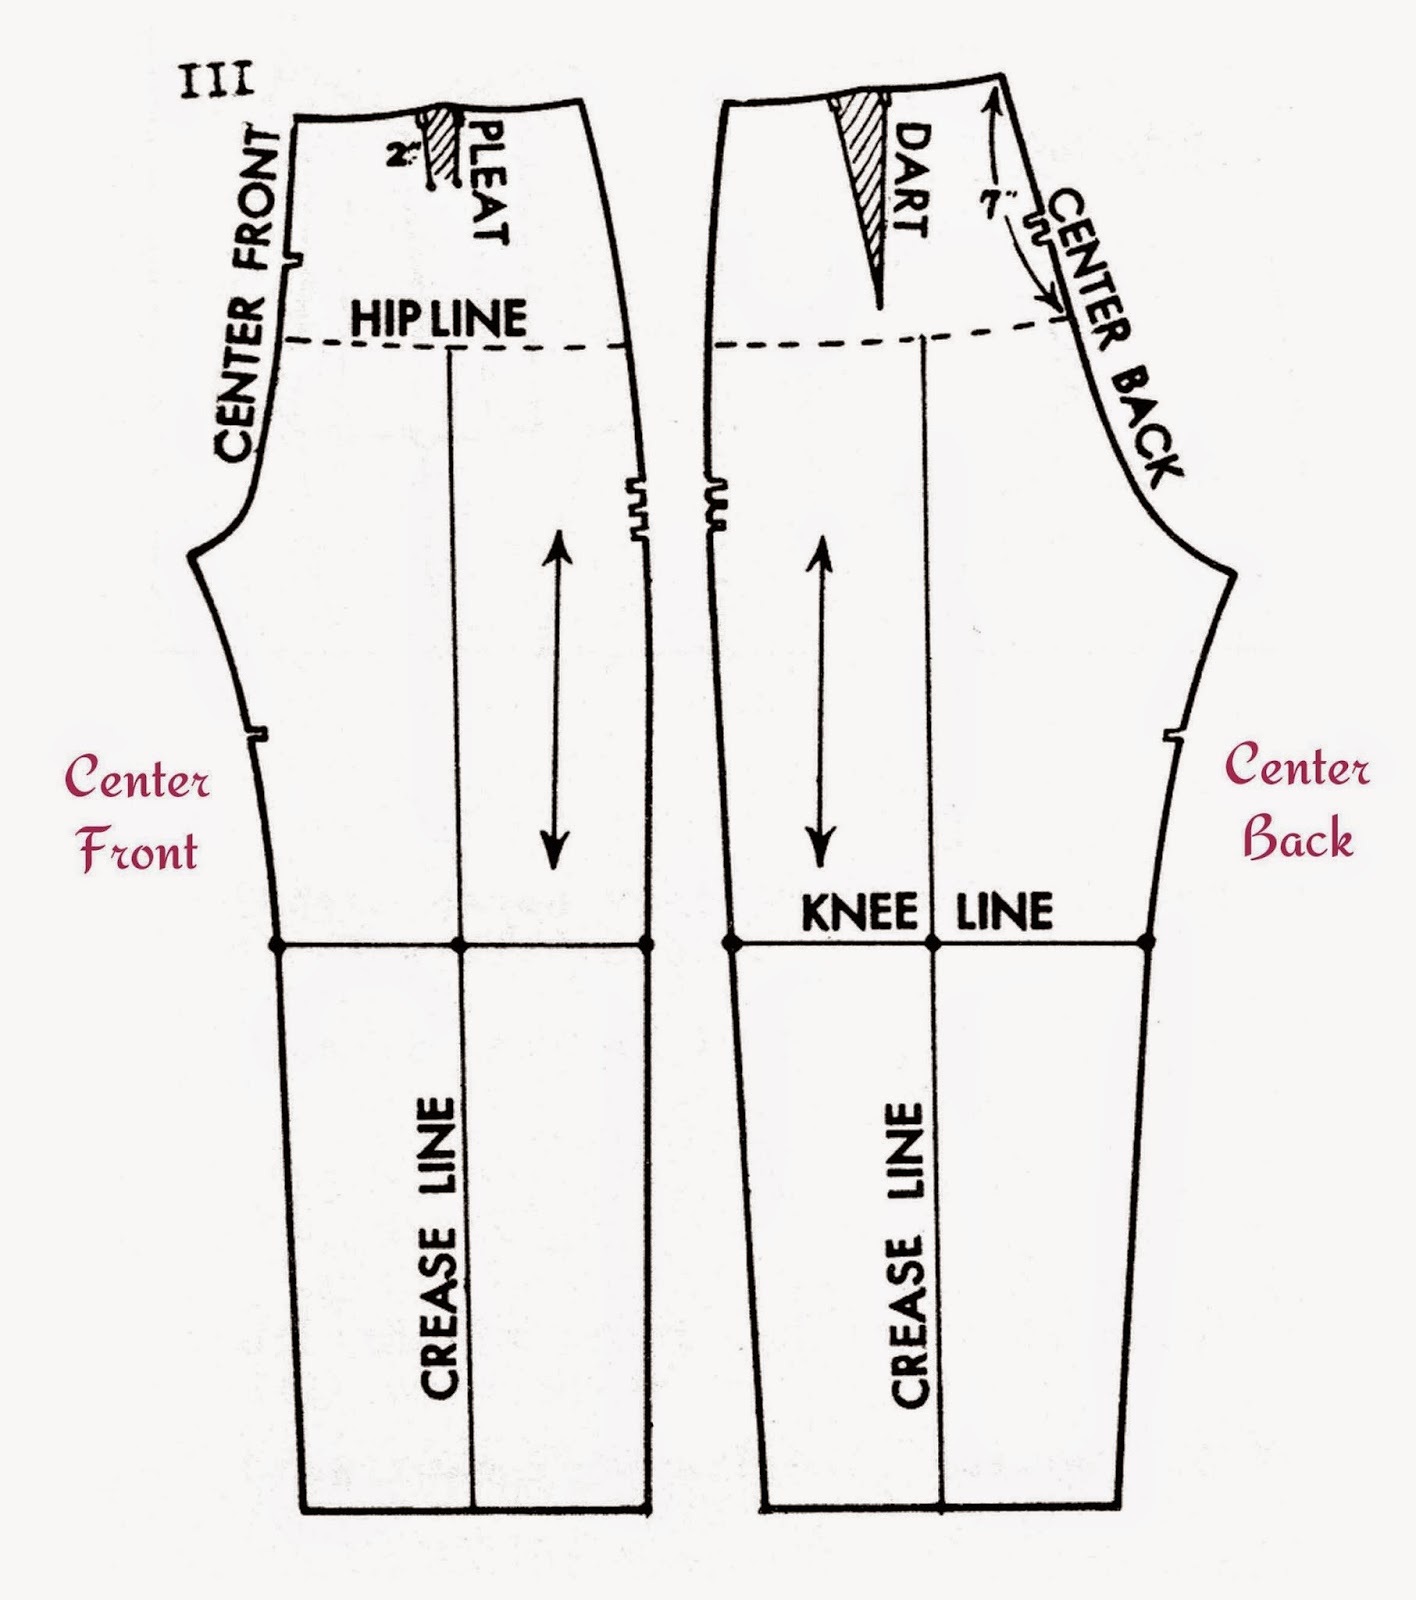
Draw waistline slightly curved, from I to A to L. Reduce waistline to fit 1/2 of waist measure. First make part of reduction at sides and center front. Then make a dart in back and a pleat in front at follows:
C to U - Equals 1/2 of C to E.
L to V - Equals 1/2 of back waistline; then draw a V-shaped dart, 6” long.
D to W - Equals 1/2 of D to C.


III. - See illustration above.
For crease lines on front and back, divide the knee and lower lines in half; then draw crease lines from bottom to hip line. For waistband, make a double band 1 1/2” wide, finished and the length of the waist measure plus 3/4” extension for left side opening. To complete pattern, add seam allowances to all pattern pieces and hem allowance to trouser bottoms. Make corresponding notches.


And there you have it! The straight waistband should only be used if you draft your pattern at waist level. If you lower it closer to your hip line, you'll need to draft a curved waistband.

Aaaaand on a completely separate note, I have decided to have a sale this week at Mrs. Depew Vintage! If there is a pattern you've been eying, now is the time to try it. Use coupon code "FLUFFEHKITTEH " in the box at checkout for a 15% discount - good until the 21st of October.

Happy sewing!


Tuesday, August 12, 2014

Sewing 610... Spiderweb Silk Rosettes


And we're back with the next installment of Sewing 610!
I'm sorry that our quick break lasted a bit longer than the week I was in Nebraska. The trip back was not as painful as I had expected, but I found that I still needed at least a week of sleep, tea, and Downton Abbey to recover what's left of my peace of mind and get back to work.

So today, peace of mind in place, I'm going to show you how to make spiderweb silk rosettes.

These were added as an afterthought to my first bra.
If you decide to sew one of these bras, your options are really endless as to how you can add embellishments. Me though? I'm a bit of a stickler for historical accuracy, and just about every piece of vintage lingerie I have from the 1930's has some sort of delicate silk rosette on it.

Case in point: a gorgeous 1930's lace bra from my collection.
You'll want to make the rosette on the right side of your bra before you've sewn the bra and the lining together. If you don't, you'll have the ends of ribbons and thread knots tickling your cleavage all day long. Have you ever had a stray hair slip down into your shirt? It's like that - and it should be avoided for the sanity of all involved.

Here is what you'll need:
  • a ridiculously small embroidery hoop - mine is about 2 /12" in circumference.
  • about 12" of 7mm or 4mm wide silk ribbon. I bought my 7mm here and am thrilled with it.
  • sewing or embroidery thread in similar color to your ribbon.
  • 1 sewing needle
  • 1 large (size 22) chenille needle (or a really massive embroidery needle, if you have one.
  • a small button
  • scissors
I highly recommend that if you haven't made these before, do a practice version first. I've gotten a lot of practice at this and I still do a test rosette nearly every time.

To keep the top of your bra from getting a bit deformed during this process, it's a good idea to run a simple line of stay-stitching across the top. Then mark a small dot where you want your rosette centered.

Place your bra (or practice scrap) in your embroidery hoop, but do so loosely and gently. It doesn't need to be drum-tight for this.


Place a small button or other round object the size of your desired rosette centered over where you marked. Holding the button in place, gently stencil a circle around it using a pencil or tailor's chalk.


Next, thread your small needle and using a straight stitch, sew 5 evenly spaced spokes radiating out from the center.


Thread your large needle with the ribbon, knot one end, and bring the needle up through the fabric very close to the center.


Give your needle a twist to curl your ribbon a bit, then draw the needle carefully first over, then under each spoke, repeating and twisting the ribbon as necessary.


Tip: to avoid piercing or snagging your fabric, use the dull end of the needle to do the threading, keeping the pointed end towards your hand.


Finally, when your rosette is as full as you wish (you'd be surprised how much ribbon you can jam into those spokes) simply bring your ribbon and needle through to the other side (piercing slightly in and under your rosette to hide it), gently knot your ribbon, and you're done!


If you wish to have a contrasting bit of stamen or pollen in the center of your rosette, you can do the following:

Bring a yellow thread, knotted at the end, up through the wrong side of your fabric and into the center of your rosette.

Moving on to the rosette on my bra now...
I used a small French knot for my stamen. To make a French knot, wrap your thread around the tip of your needle about 3 times, holding it all very firmly.

Pardon my nails, I'm in need of a bit of a spa day.
While still holding your thread securely wrapped, pierce back into the rosette almost exactly where your thread comes out to start with. Using the tip of your finger, keep the wrapped thread, slowly forming into a knot at this point, pressed down as you very carefully pull your thread all the way through to the other side.


Then simply knot off your thread on the wrong side and voila! A lovely little silk rosette!


I'll be back with more Sewing #610 when my much awaited, and much belated silk fabric comes in the mail. The fabric that I had chosen to line this fine little beauty with turned out to have snags and runs galore (a fit of epic proportion and duration was thrown) so I'm in holding pattern mode at the moment.

Happy sewing,