Showing posts with label sewing patterns. Show all posts

Sunday, October 25, 2020

The Royal Pattern Company - A Bit of Sewing Pattern History


Happy weekend, my dears. Today I thought I would post just a short bit on sewing pattern history. As some of you know, I'm one of the founding Admins of The Vintage Sewing Pattern Nerds group on Facebook. My goal has always been to educate others on sewing pattern history and preservation. To continue that thread, I'm going to attempt to post more of the educational content I post to the group, but for your benefit here. Not all of you are on Facebook, after all (Which you should be proud of!).

Today, our topic is the Royal Pattern Company.

The Royal Pattern Company (not associated with Modes Royale) began selling sewing patterns in 1895 and printed their magazine Le Costume Royal beginning in 1896 to advertise their patterns. This was common practice for sewing pattern companies at the time (See The Delineator Magazine, McCall's Magazine, Le Bon Ton etc.).


The Royal Pattern Company merged with Vogue Pattern Company in 1924. Vogue patterns at this time began to carry the "Vogue/ Royal" label. By 1927, the "Royal" no longer appeared on Vogue patterns.

This particular issue came to me missing several pages but still includes a full-color centerfold and several numbered illustrations advertising patterns available for mail order.

Can you imagine getting such a pattern via mail order now?

Patterns from The Royal Pattern Company, Vogue Royal, and Le Costume Royal magazine/ quarterly are quite highly sought-after by collectors so if you find one, hang on to it!
Sources:
My own personal collection of patterns and quarterlies.

How about you? Have you ever seen a Royal sewing pattern (not to be mistaken with Modes Royale) or a similar edition to this magazine? What is (in your opinion) that rarest pattern you've ever found. I'd love to hear from you!


Monday, February 20, 2017

How to Properly Mend Sewing Patterns


Pattern repair and preservation are topics that don't come up very often unless you're a die-hard pattern collector or an experienced sewing pattern seller. Many people might reasonably assume that a sewing pattern or envelope with tears is worth less than one without. That makes sense. What they might not know, is that a pattern or envelope that have been repaired with any kind of tape is likely worth LESS than a torn, un-repaired one.
Here is why.


Tape adhesive can degrade and change color over the years. While it might be a temporary repair, old tape can eventually weaken the paper surrounding it, stain the pattern paper, and in some cases eat through delicate tissue leaving nothing but a shredded, inflexible plastic remnant.

I thought that I would put together a quick guide to pattern repair for anyone who is interested. If you have any suggestions gleaned from your own collecting experience, please do leave a comment to share with us!

Allow me to first say though, that this is not a lecture or condemnation to those who have taped their patterns in the past. Your pattern is your property to do with as you wish, and I would simply be happy to teach you a way to help those damaged patterns to not only survive longer, but also retain their value and integrity in the future!

Pattern sellers should pay special attention to how, and if, they choose to repair their sewing patterns. Collectors like myself are not terribly concerned with a torn piece or envelope here or there, but we are VERY concerned with patterns that have been taped in any way. It is always safer to leave a pattern un-repaired and let the buyer fix it themselves if they are so inclined.


The basics:
Do not tape any part of a pattern or envelope with scotch or any other regular tape. Things to avoid using include shipping tape, masking tape, duct tape, washi tape, staples, sewing pins and paper clips. All of these can do more eventual harm than good.

Friday, January 13, 2017

Some Catalog Love from McCall 1929...

Hello my dears,
Today's post is simply some eye candy from a McCall's  Sewing Pattern Catalog from 1929. I've been catalog obsessed this last year. I started with one, fell in love and before I knew what had happened, I had just under a dozen.
Lord help me, but they are beautiful to behold.
So without further ado...


Wednesday, January 21, 2015

McCall 5044 - A 1920's Robe in Luxury Cottons

Hello my dear readers, I'm back!
I'm sorry it's been such a long time since my last post! I have been so busy that something had to give temporarily and I'm afraid that something was writing. However, I have been doing some projects in the meantime and have finally got the time to share with you. My only New Year's resolution this year was to work a little bit less and to sew a little bit more and so far, it's rather nice!


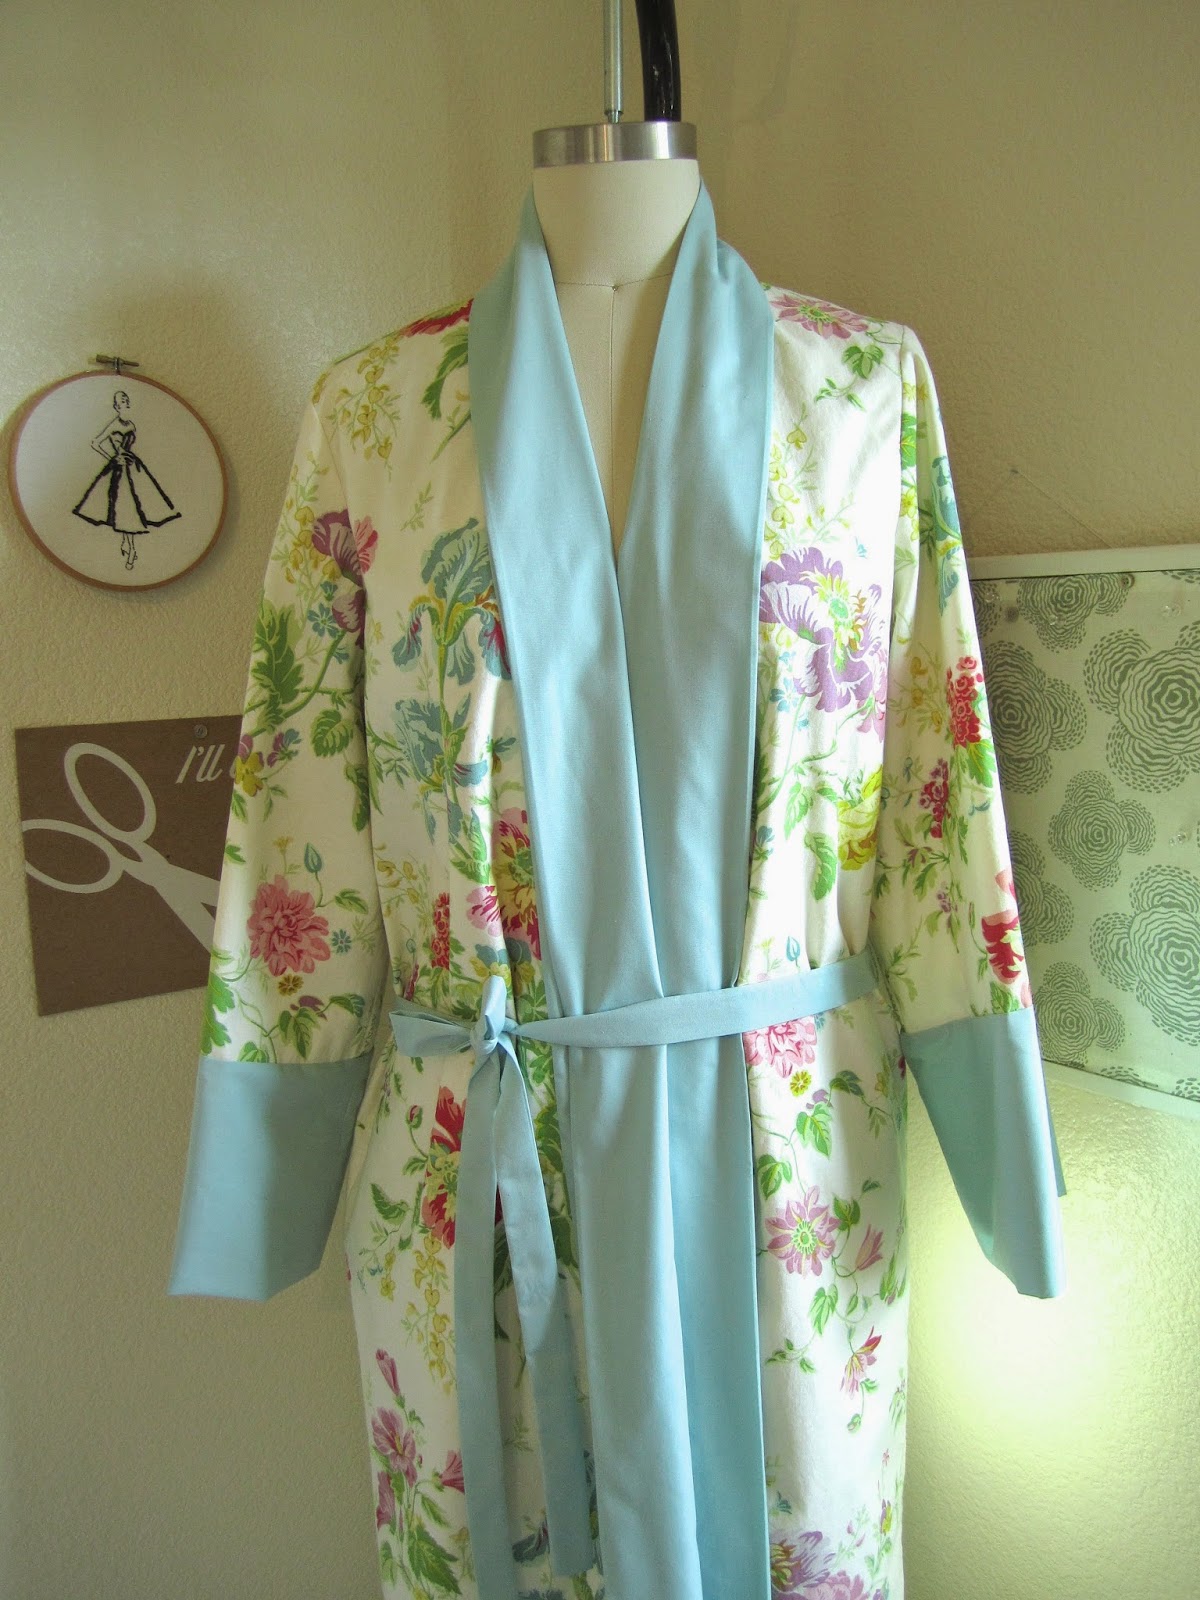
McCall 5044 Ladies' and Misses' Negligee

My most recent project was McCall 5044. I found this pattern a while back on Ebay and imagine my delight when I searched my magazine collection and found it featured in a December, 1927 edition of Fashion Service Magazine!


 I fully intended to sew this lovely negligee in silk but I wanted to make a wearable muslin first, and I decided to use some really beautiful cotton from my stash.
The main body fabric is from the Olivia Collection by Anna Griffin.


The instructions were a bit vague (quite common for 1920s McCall's) so I had some room to customize the pattern. I made version A and lined the interior with soft cotton so all seams are neatly concealed. I also lengthened the sleeve bands a bit to allow for my rather long arms.


Instead of sewing fabric carriers I followed this incredibly nifty Youtube tutorial and made thread carriers for the sash. It was so much fun to try something new, and to avoid stitching those darn cloth carriers made my day!


I also searched high and low and found a lovely art deco rose motif online, adapted it a bit, and embroidered it with my initials on the sleeve.


I know, I went a bit overboard for a wearable muslin but every step of sewing up this negligee was more fun than the last and I just couldn't help myself. It went together so easily and I can't wait to make another one in some sumptuous silk.

Update: This pattern is now available as a multisized reproduction in both PDF and print!

How about you? Did you do any recent sewing or make any sewing-related New Year's resolutions?

Saturday, July 26, 2014

Sewing #610... Drafting your pattern.


Hello lovely readers,  I'm so glad to hear that a few of you will be following along with me for our mini sew-along!

The pattern we're using is what I call a draft-at-home pattern. It means that you have a very small pattern with a series of numbers on it, and it is enlarged to your measurements using the measuring bands/ special rulers that come with it.

My pattern and measuring band, ready to be drafted to my size.

To draft your pattern, you can use the instructions included along with your pattern, or you can see how it's done in this photo tutorial. Please don't be intimidated by this, it will only take you a few minutes to draw out your pattern!

You can also check out my draft-at-home pattern F.A.Q. page if you need any quick answers while working with  your pattern.

Below I have my drafted pattern using the 92 cm band. This is my full over-bust measurement in centimeters.

Here is my pattern before I have connected the dots.
I am using a French curve to draw out my more rounded lines.

Once your pattern has been drafted, you'll want to do a few things to ensure that you have a good fit and an easier time sewing.

First, you want to make sure that your dart legs are the same length.

Measuring my dart legs.
If your dart legs are different lengths, measure down from the tip of the dart along the dart leg and mark the difference. If you have a difference, you'll want to divide that difference out between the two dart legs equally. (Example: if dart leg A measures 3" and dart leg B measures 3 1/4", then your difference is 1/4" and you will add 1/8" to dart leg A and shorten dart leg B by 1/8".

Adding the difference to one of my dart legs.
This is called truing your darts.

Re-drawing the curved line from my added dart let length to smooth it out.
It is also be a good idea to measure your dart intake (the distance between your dart legs) in case you need to make more adjustments later.
Once you've checked out your darts, you're almost ready to cut out your pattern. This pattern has a seam allowance included but you need to make sure that your darts have an allowance too. (You know how your darts are often slightly peaked at the pattern's edge? We need to make sure ours do that too.) This is easy, don't worry.

My bra pattern drafted out and my dart legs trued.
Starting with one of your darts, fold the pattern in half horizontally so that the tip of the dart is right on the fold line.
Folding your paper again along the dart leg closest to the center back, fold the dart leg over towards the other dart leg.
A horizontal fold with the dart tip at the fold.

Once your dart has been folded, it will resemble how it is to be sewn.
Pin both of your darts closed and then cut out the pattern. If your dart legs are trued properly, they should match perfectly when folded together. If not, you can just re-true them before cutting out, while the dart is still folded.

My pattern cut out, while the darts are still closed.

Now your darts automatically have those nice little peaks that will allow your dart to rest properly on your bust. Without doing this, it can make your darts pull and can cause some annoying fit issues.

At this point, it's a good idea to determine what manner of back closure you're using - if you want to simply add hooks and eyes instead of a French or purchased closure, you need to measure and make sure that the bra back reaches far enough for your needs before cutting it out. Or, you can always just tape an extension onto the back of the pattern piece if you need more room. 

It's also a good idea to put a tiny notch in the upper back end of the pattern. This can come in handy during test fitting, to help you tell top from bottom!

Cut one, center front on the fold.

Now your pattern is ready to be cut out of your muslin or practice fabric to be tested on yourself!

Any questions?

Happy sewing,


Friday, April 18, 2014

Back to Blogging with a Sew Expensive... Simplicity 2229

It has been a very strange month. Recently I have been able to get back to working a bit and have found it a very welcome distraction from... everything else.
I've been trying to figure out how to ease myself back into blogging next but - this being my first experience with this kind of life-altering grief - I didn't have the foggiest idea of how to do it. When is too soon? Do I have anything worth writing? Can I even sit still at a computer that long without dissolving into a puddle of tears? Do my readers really want to be depressed to death?

As with some things, ripping the band-aid off is, I think, the only way to do it. But I am starting easy. A nice, happy Sew Expensive post should do nicely.


These posts always make me happy. Shopping for patterns is a fantastic coping mechanism and last month, as I was trying to take my mind off of other horrors, I turned to Ebay for all of the lovely distractions offered there.

This one I bookmarked because it was just too pretty not to talk about. Simplicity 2229 recently sold on Ebay for an uncomfortable, yet relatively reasonable $157.64.


Was it worth it? Well, yes and no. There's always the debate of a pattern being worth what one person is willing to pay for it. And sure, if you're more interested in say, making a reproduction of the dress, then why not? But from a pattern collector/ seller standpoint, the sad condition of the envelope has me shaking my head and mouthing a big "Nope."

Yes it's quite rare, obviously this pattern doesn't come up for sale very often, but if you just want to sew a dress, then I think The Vintage Pattern Lending Library or another pattern reproduction company would be your best bet.
I think about the value of gown patterns more in depth about once a year - usually when the date of the next Air Force ball gets announced to all and sundry.
And were I to make a gown, and not use one of my own personal collection, or one of the gown patterns from Mrs. Depew Vintage, then VPLL would be the way to go. And if I had to choose, I would choose this beauty:

McCall 7595 Pattern Reproduction by The Vintage Pattern Lending Library.

At the fantastic price of $17.50, wouldn't you agree?
And if I may ask, what is the most you've ever spent on a sewing pattern, and why?
For me, it was to get my hands on one of my much sought Simplicity S-Series patterns, and I spent $105. Shhh, don't tell my husband!


Sunday, February 16, 2014

My Favorite 1920's Teddies... and a free sewing pattern!

The 1920's brought us some truly wonderful fashion revelations, my favorite being the loose-fitting dress and less constricting undergarments to accompany them. Lingerie also got so much easier to sew with little to no boning, fewer seams, and simpler designs!

The best part of this, in my humble opinion, was the advent of the Chemise (also known as the teddy or cami-knickers). It could often be sewn from two squares of fabric and was a great way to reuse fabric to make dainty things.

Original 1920's lingerie patterns are nearly impossible to find. In fact, they're practically the holy grail to lingerie pattern collectors like myself. Teddy patterns from the 1920s are the rarest of all. If you do a Google search you'll find hardly any at all. Sad Face.

I have quite a few in my collection though and I thought I would share.

McCall 5124 1920s Step-in Combination Chemise Camiknickers.

McCall 4487 Mid-1920s Ladies' and Misses' Step-in Chemise.


McCall 5818 late 1920s Step-in Combination is available as a reproduction pattern here.
These beauties are so lovely and when they do rarely crop up, they are often quite expensive (and rightly so!). This makes getting your hands on that 1920s look rather hard and one must often turn to reproduction sewing pattern companies like mine to find something to substitute for an original.

But today, I thought I would skip all that and just give you a free pattern!


This is a digital PDF copy of an insanely easy sewing method for a lovely set of step-in combination teddies from 1926. The pattern for two different versions was originally published for the newspaper column of a "Fashion Expert". This pattern would also make an amazing little neglige for when you need one in a hurry.

I have digitally enhanced the images but the instructions are the exact wording used by the original designer. The grammar and writing style tells me that the "Fashion Expert" was most likely a French woman writing in English and the way she expresses herself is so charming!

It is not necessary to print this pattern. The "Pattern" given is a very easy-to-follow set of instructions for cutting and draping a certain measurement of fabric with several drawings and diagrams.
This is a great way to use up some of those vintage scarves hiding in your closet, or a nice length of silk you haven't found a purpose for yet.

Happy Sewing, mes cheris!