Showing posts with label 1960's sewing pattern. Show all posts

Sunday, March 26, 2017

Sew Expensive... Vogue Couturier 535


To continue the train of thought a bit from our last post, we have another expensive luxury pattern selling for a good deal of money.
Not long ago, Vogue 535 sold at auction for $168.49.


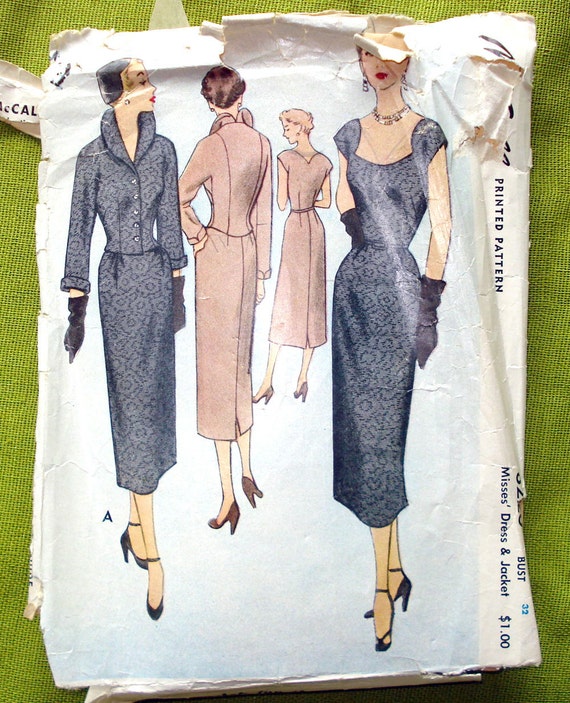
Though high, this is really the going average for late 40's early 50's Couturier patterns with any character. By character, I'm referring to patterns with interesting or unusual details. Note the high collar, asymmetrical button closures and dramatic sweeping lines of the tunic in the illustration above. The more details like these, the more complicated it is to sew, the higher the interest and value to collectors.

In our last post, we saw a 1930's Vogue Couturier pattern sell for $360.
Over the last few years of tracking the selling prices of these, it seems that they follow a price trend by decade.

Vogue 862 available here.

On average, 1930's Vogue Couturier patterns sell for between $200-$380.
1940's-1950's Vogue Couturier patterns sell for between $100-$200.
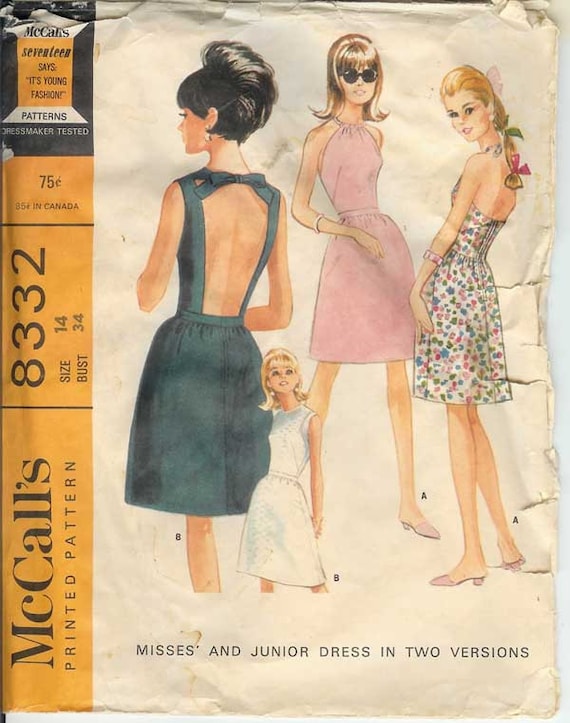
1960's/ 1970's Vogue Couturier patterns sell for between $40-$200. This is also interestingly the decade that Vogue chose to start advertising the couture designer responsible for the patterns, with patterns by Dior, Chanel, and Givenchy fetching the highest prices.
These averages are dependent on a few things. These are auction selling prices. Buy it now prices found from pattern sellers on Etsy and other websites might vary on the mood/ experience/ clientele of the pattern seller.
Also keep in mind the evening gown patterns will be quite a bit higher than these averages.

Vogue 2971 available here.
If you've got one of these in your collection, be sure to check and see if it has all of its instructions. These patterns often had two separate instruction sheets with the cutting layout often on another sheet entirely. If you only have one sheet, make sure that it has both cutting and sewing instructions on it.

Another thing to keep in mind is that while some of these patterns can be found with "Vogue Couturier" cloth labels inside - a pattern is considered complete without it. The cloth label was not automatically included in each pattern - one had to request them at the pattern counter when purchasing and many buyers simply didn't bother with them.

How about you? Do you have any Couturier patterns in your collection? Did you get a great deal on them? Find them at a thrift shop? Pay dearly for them from another collector?

Happy sewing,


Friday, April 6, 2012

The Much-Anticipated Bathing Suit Pattern Giveaway!

My lovely readers, you have been so patient with me. I put off the main part of my pattern drafting work to do the Pin-Up Sew-Along and now that we've reached a nice lull with that, I have finally had time to finish the much asked-for and anticipated bathing suit pattern!


Many of you are familiar with the famous photograph of Marilyn Monroe in the lovely and clingy white bathing suit and that was my main inspiration for putting the pattern together. I find myself getting a bit curvier than I used to be (isn't that always the case?) and I love the idea of a suit that emphasizes those curves while still providing a bit of modesty for the one's you'd rather not draw attention to.


I also created it in sizes x-small through x-large, in two versions, one strapless and one with halter collar strap for supporting those more endowed like Marilyn than myself.

Before I got started I had fun using an app called Penultimate to create a mood board with bathing suits and patterns that fit into this glamorous Hollywood image that I wanted to recreate, adding sketches and ideas to incorporate into my cover image for later as I progressed.


And of course, as I always do when I release a new pattern, I'm offering a free copy to one lucky winner!

To enter the giveaway you can do one or all of the following, just leave a comment for each entry to get your name in the proverbial hat.

1. Tell me what kind of pattern you'd like me to create next. I'm always open to suggestions!

2. Become a follower of A Few Threads Loose on Twitter, Google, or Bloglovin'.

3. Like A Few Threads Loose on Facebook.

4. Like Mrs. Depew Vintage on Facebook.

5. Mention this giveaway on your blog.

I'll announce the winner this Monday the 9th.
Good luck! 


Tuesday, January 31, 2012

The Bateau-Neck Blouse

I have a tripod! I finally got around to getting one and it has made taking blog photos so much easier. If you blog and you want your photos to come out a bit better, I highly recommend getting one.
So I used the tripod recently to take pictures of my latest sewing project, a bateau neck blouse using the pdf pattern I recently released.

Here's the finished product:


 I wanted to use this beautiful vintage grosgrain ribbon that my mother gave me but there wasn't very much left of it. Hence, only three ruffles instead of four.

Saturday, November 5, 2011

Lingerie Sew-Along: Everything you need in one place!

I just thought that I would include a link to each individual lingerie-sew along as sort of an index where you could skip to the step you're looking for without having to drag through the rest of the blog posts. Here you go!


Bra:

Part 1: Printing the pattern, and adding seam allowance
Part 2: Resizing, Layout and Cutting your bra

Part 3: Darts, Pressing, and Attaching the Bra Band

Part 4: Binding the top of the bra

Part 5: Finishing the bra band

Part 6: Closure, straps, finishing touches and pictures

Tap Pants:

Part 7: Starting the Tap Pants
Part 8: Tap Pants Cutting, Darts and Yoke

Part 9: Inner Leg and Front to Back Seams

Part 10: Tap Pants Lace Inset and Front/ Back Facings
Part 11: Tap Pants finishing touches and pictures


Slip/ Cami:

Part 12: Starting the Slip, Cutting, and Contour Darts in Slip Back
Part 13: Bust Darts and Gathers, Joining Bodice and Slip Front

Part 14: Side Seams, Facing Bodice, Binding the Top 

Part 15: Final Touches and the Finished Product

Mail call, and I still have books on my mind!

I just love it when my sweetie comes home with a big pile of mail for me. He picks it up on base and brings it home from work with him. Yesterday was the first time he checked the mail in about three weeks since we were on vacation in the U.S. and boy, did some good stuff show up!


Most of this I bought online right before we left, or later whilst hunting online, morning coffee in hand, on vacation.

 I'm really excited to find out that Spadea Patterns released their own book, The Spadea Sewing Book: Sewing Tips by World Famous Designers (1967).

Another great book that came in the mail was Underwear and Lingerie from the Women's Institute of Domestic Arts and Sciences (1940). I'm sure you'll hear me referring to this one often, as it covers EVERYTHING!

Thursday, November 3, 2011

Is a seamstress only as good as her library?

I have some great sewing books in my collection. Some REALLY great ones. I'd say that about 50% of what I've learned about sewing in the last 5 years is from those books. And the other 50% is a mix of the internet and calling my mother.
I have 18 sewing books now, and counting. Most are vintage, and some are new, which reflects what I sew. I love getting stuck on a vintage pattern (What the hell does this thing mean by telling me to 'Fell a seam'?) and running over to the bookshelf and pouring through the many appendices until I find the right instructions.


Here are a few that I highly recommend if you can find them:

McCall's Complete Book of Dressmaking by Marian Corey, 1951.
You might recall me mentioning her as the author of Adventures in Sewing, which was published regularly in McCall Fashion News booklets. I love this book just because of the pictures. Swoon.


 Art of Dressmaking - Butterick, 1927.
There are several being sold on Etsy at the moment!
It's one of the few vintage sewing books that I have that mentions lingerie sewing and plackets for underwear and there are lovely photos that illustrate how to do everything!


The Vogue Sewing Book -Vogue Patterns New York, 1970-1978, all editions have been good.
There are so many clear illustrations and instructions that it's almost like having an experienced seamstress in the room.

Tuesday, October 11, 2011

Lingerie Sew-Along: Resizing, Layout and Cutting your bra, Part 2

For today's installment of the Lingerie Sew-Along we'll be going over sizing issues, layout, and cutting out your bra. First I would like to address questions and comments from the last post.

One commenter asked "Could you be more precise on what to do if the bra cup is too small? Or any alterations to the bra cup whatsoever. Also: Why isn't the bra band curved like it is on all other bras?"

Thanks for your question. First I'll address the bra band question. I'll talk about sizing the bra cup in this post as well.  The bra band is cut at an angle from the fold of the fabric, giving it a natural curve shape that matches the lower curve of the bra cup. The back is a bit curved naturally but this comes from the bra band being cut on the bias and therefore having a bit of stretch. You should also keep in mind that not all bras are created equal, or in the same era for that matter. Some don't have bra bands at all, and those that do aren't always curved.

And Annabelle commented that she wanted to see one of these made up. Good idea!
 Here is a picture of a lace and satin version of this bra that I made recently.


Once we have covered the basics of this pattern, I'll also be teaching you how to make variations on the original, as well as a tutorial for a lace version.

Lets get started with sizing, shall we? It's not the easiest sewing trick to make a bra cup larger, especially if it has 4 freaking darts to throw you off. This won't be an exact science either because every girl's "girls" are shaped differently. Here is the basic idea for you.

1. Tape your original bra pattern pieces together so that you have the original as shown in our last post.
Do NOT add your seam allowance to this yet.
2. Cut out the bra piece and have a large piece of paper ready.
3. You will want to cut the pattern piece as shown below:

Cut through each bottom dart all the way to the top, sort of at a point. Start with adding 3/8 of an inch to each gap for the next size up, keeping the top sort of together as much as possible. Then tape this to a large piece of paper and then you can start adding your seam allowance. You'll need to retrace the darts on to the new pattern, and make sure the darts are the same size as in the original. You can space them out about 1/2" from each other. It doesn't have to be exact.


This should add room for another cup size. If your bust is say an A or B cup, you should be ok in the original pattern. If you're truly blessed in that department, then you might need to add another 1" or so to the top line of the bra, as if you were adding a seam allowance to that end.

This pattern is a 34" bust, and if you're say a 36 B, you can just add another 1" to the back of your bra band. The above is an approximation and you might have to give it a couple of adjustments to make it fit you properly.

Now on to cutting layout. For this version, I cut out 4 bra pieces from my plaid flannel and 2 bra bands from my contrast fabric. My contrast fabric is an old scrap from a vintage slip that I've had in my scraps bin for ages. Waste not, want not!

Starting with the bra band:


 The angled end goes on a fold. As you can see, I have my "just in case" extension there on the back end of the bra band. At this angle, the band is cut on the bias and will have a bit of stretch and curve to it.

You can simply cut out a second right next to the first bra band.

 Next I have my super soft, light weight flannel folded on one end. You can cut two bra pieces from your outer fabric and another two from a lining fabric or scraps.


I have just cut out all four from the same fabric. When I'm done, my bra will look the same on the inside as the outside.


 When you're done, you should have these:


 Tomorrow we'll go over darts and sewing our bra pieces together.

Any questions?

Post # 1, Printing the pattern, and adding seam allowance.

Sunday, September 25, 2011

Some lovely pictures... and a bit about lingerie.


Today, my lovely readers, I have for you some pretty highlights from La Mode Pratique, August 1934. It was a very popular French ladies magazine that included fashion spreads, sewing patterns, knitting patterns, household tips and tricks, the occasional book review and what have you.
I bought this particular edition the moment I saw it because of the cover:


Some of you may already know, I kind of have a thing for guns. And old pictures of women with guns are WAY better. I'll be framing this one and hanging it in a place of honor somewhere where I can see it every day and wish I were her.


If you can read or speak French, you might enjoy the knitting patterns in these pictures. If you want to give them a try, I'd love to see what you make of them!


And by now you should know how I feel about lingerie. I love the picture up above, so lovely, so feminine, so slimming.  On the lingerie note, many of you have commented on the giveaway post that you would like to see me do more lingerie and I'm more than happy to oblige you. I went and spent about $150 JUST on lingerie at H&M yesterday, and funny enough, it just made me want to sew more and more of it, until I have an endless arsenal of sexy, well-made lingerie for every occasion.

I drew my sewing inspiration today from Ohhh Lulu's beautiful flannel and feminine lingerie post. If you haven't checked her out yet, you must, and if you love her creations as much as I do, you simply must check out her etsy shop as well.

Photo from Ohhh Lulu (http://ohhhlulu.blogspot.com/2011/09/black-white.html)
Her use of ultra soft flannel has made me think that using it myself would be a great way to show all of you that sewing lingerie isn't scary at all, but very rewarding and fun. And let's face it... if the end result is looking sexy, who wouldn't want to make it?

What do you think? If I did a lingerie sew-along and we started with flannel, would you be interested in giving it a try?

Thursday, September 1, 2011

Bathing Beauties, and the winner is...

I have the internet working! We've been moving into our new house and they just connected the darn thing. But enough of my drama, you want to know who the winner is, don't you?

The winner as chosen by the random number generator is commenter #11,  is Holly!
Congratulations Holly and thanks for sharing what makes a swimsuit perfect for you!

"what i look for when i'm buying a bathing suit is basically the suit i had between the ages of 13 and 15. it was perfect. it was kind of 1940-50ish (i thought.) two-piece, white and navy blue polka dots and stripes. the bottoms were belly button high and included loose shorts that gave the impression of being a skirt without the fuss of floating up in the water. the top was a halter and gathered in the middle. i wish i could remember the brand because i would HUNT IT DOWN. i think i got it at dillards. i should figure out how to make that suit."

 
 I think we can all relate to having had that ONE swimsuit that made you look and feel amazing, and wishing you could go back in time and buy 5 of them at once. So Holly, you can email me at afewthreadsloose@gmail.com and I will send you your pattern!

For those of you who still want the pattern, it's a mere $5 in my etsy shop.

On another happy note, I'm decorating the new house like a mad woman, trailing fabric swatches around the house and giving my sewing machine quite the workout. We have wonderful new black leather couches and I'm getting ready to sew some pillows to make the room POP. My fabric is silk dupioni in iridescent jewel colors. I'm going to alternate between these two colors:


What do you think? 
There will be a twist, of course... here's a hint: 


This is my practice run in micro-suede. I see a lot of applique in my future.

Tuesday, August 9, 2011

A little history of the teddy...


Today I thought I would share a little bit of my inspiration in creating the Teddy - Combination Undergarment pattern:


The teddy, also known as the combination undergarment, envelope chemise, and cami-knickers started out as a nice little piece to wear under dresses as they got shorter and shorter in the 1920s.


The teddy gained in popularity in the 1940's when the outbreak of World War 2 meant that women were just as often wearing trousers as skirts.

Oh my God, does anyone know where I can find some slinky charmeuse with little stars on it?!
Reproduction pattern available here.

The teddy worked nicely as underwear and camisole for a more comfortable, versatile underwear.
 In my research I actually found more British patterns for "cami-knickers" than American ones.


Image courtesy of bigfeetbears blog.

After the war, they seemed to loose popularity and you see less and less of them until they had a mini revival in the 1980's/ 90's in this form:


Ugh. Enough said.
If you haven't entered already, don't for get to check out the Teddy Pattern Giveaway!

Sunday, August 7, 2011

Gearing up for mayhem...

I am shortly to start job hunting again... which is litterally my least prefered past time.
Things I would rather do than job hunting:
  •  Have a visit to the gynecologist
  • eat mayonaise that's been left in the sun for hours
  • spend 48 non-stop hours walking in 4" heels
  • run a marathon in the nude
  • wear a dress made entirely of live snakes
I think you get the idea.
So to compensate for this horrid thing that I have to do again, I'm going to have to sew some super fabulous outfits to do it in. Hence my latest sewing pattern purchases. I thought you might like a look at how I'm going to survive it all in style:

McCall's 5262:

I just bought this lovely business this morning over my morning cup of tea. I plan on making version A on the left... in cobalt blue if I can find the fabric...

McCall's 5637:

I think I'm going to have to make this one in just about every color. I don't normally go for bolero jackets but this one is really making me change my mind. I may just have to make the whole outfit up.

McCall 8220:

I bought this one about a week ago and I'm expecting it in the mail any day now. What I really love is the sleeve detail; it's all one piece, bodice and sleeve and it creates this really gorgeous line. Can you tell that I'm going to be looking for some sort of office work? My Norwegian has gotten a lot stronger and I'm hoping that I don't end up as a barista again... if I do, well, there will be a whole new post on fantastic cute 1950's party dresses and separates (my go -to barista garb).

On another note, I found my white whale. I really did! I have been hunting online just about every day for this pattern for two years!

I got it just days before I left for the states and I'm getting ready to make it up next in a fantastic 1950's rose print.

There's more to come soon on several new pdfs I have added to my etsy shop so stay tuned!