
 |
| Pauline Tap Pants |
Hello from Virginia! I'm on day 2 of vacation and slowly recovering from jet lag and the "my husband lost his passport" debacle. But I am recovered enough to hopefully put together enough of this post to let you get started on your tap pants if you haven't already.
By now you should be ok on the details of printing out your pattern (Don't forget to scale to 100%!) and taping the bits together.


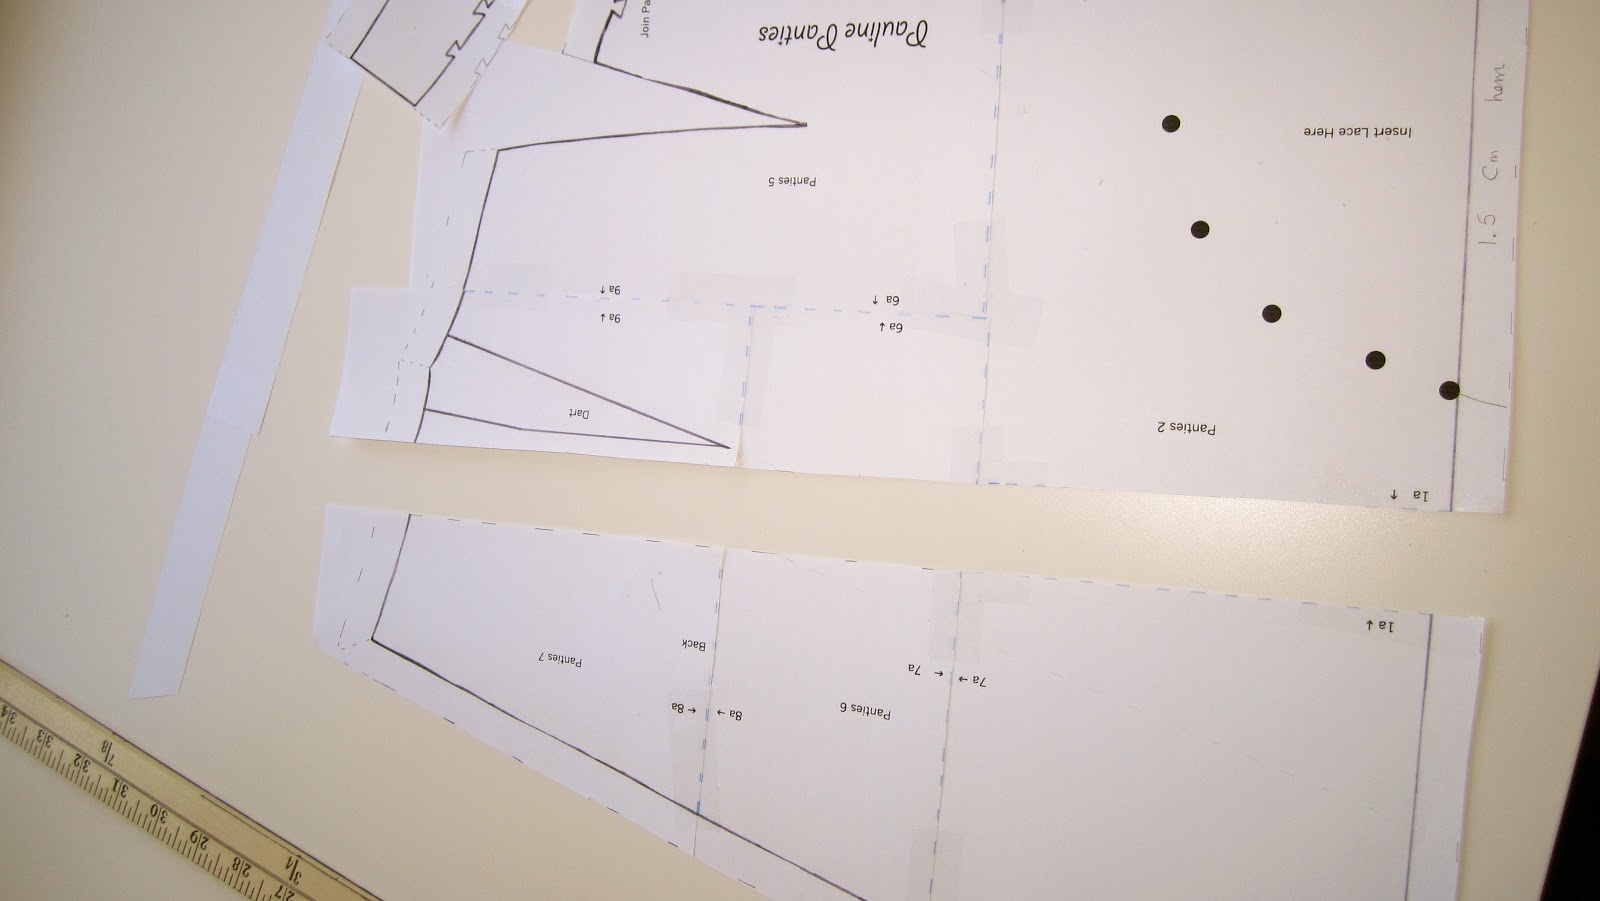
Once you have the pattern all taped together as above, you can start adding your seam allowances. I add 1.5 cm for my seam allowance. Why centimeters, you might ask? Because although I'm an American, I bought this nifty set of rulers in Norway that are clear and make adding a seam allowance a breeze. They are in centimeters, and that just makes my life easier. You can also go with 1/2" seam allowances.
You don't need to add any seam allowance to inside the v-shaped gap at the top of the pattern, it's not completely possible to anyways. This is where we will sew our placket. Add your seam allowance to the entire top edge of the whole pattern.

Below is the top of the pattern with the added seam allowance.

Add the same seam allowance to the top and bottom of the pants yoke. You don't need to add seam allowances to the sides as one is placed on a fold, and one is where the placket will be attached.


You can also trace out the lace insert from the pants leg, you don't have to add any seam allowance to this piece.

You also don't need to add any allowance to the bottom for a hem, as this edge will be bound in bias tape. However, I have very long legs (32" inseam) and after measuring the pattern from waist to hem, I need another 1/2" to keep my bum from peeking out.

Above is roughly how your two tap pants pieces will be sewn together.
And now we should be concerned with how these are going to fit you. The pattern is originally a 28" waist, which I wish I stilll had, but don't. I'm a 30" waist now (boooooooo for hamburgers) so I'll need to add 2".
Since the pattern below is half of the tap pants (we'll cut 2 out) I need to add 1" total to my pattern, and this I will split up 1/2" at the front and 1/2" at the back.
Start by placing the yoke piece on the pants piece where it will be sewn in place. I just pin mine to keep it in place for the next few steps.

Above my yard stick is placed along where I'll make my first cut in the pattern, all the way from waist to hem.
Below is the dotted line along seam 2a and 4a that I have just extended in a straight line to cross over my pants yoke as well in the same place.

I cut all the way down and separate the two pieces. This is where I'm going to add my first extension.

This is where some of the extra scraps of paper from cutting out your pattern will come in handy.

I made a 1/2" wide strip long enough to go from waist to hem and taped it in the gap I created.

Now I'm going to add another 1/2"to the back, just behind the back dart.


There are some flaws.
I find it rather common, allarmingly so, to find glaring flaws in patterns. It might just be a run of bad luck, but out of the 5 different 1940's tap pants pattenrns I have sewn, 3 had major design flaws that greatly affected fit.

Can you guess where the flaw might be? First, to check the fit, we need to pin our dart closed.

Now if you measure the pants waist from back to front you see that (in my case at least) I have 15". If I cut two of this pattern piece I'll have the 30" I'm hoping for. Except for one flaw.
If you cut the V gap out where the placket will go then you have to account for the fact that the 2" gap at the top will be closed.

That's right, your pattern will be 4 bloody inches smaller than you planned.

The way around this is not to cut out the V at the top. Instead, you will leave the fabric in the placket V, and when you're ready, just cut a straight line from the waist to the point of the V. This will give you a place to put your placket without sacrificing any inches at the waistline.
If you jumped ahead of this point (I know some of you did) I have devised a way of fixing this problem if you have already cut out your pattern pieces with the V open. (more on that at the end of the post).
But first, we need to trace out a back facing piece. Unlike modern sewing patterns, many vintage patterns required the seamstress to devise her own facings. This is one of those patterns. Here I have traced a facing piece off of the back half of my pattern piece.
Start at one end where the edge of the placket will go. Since we're adjusting where the placket will go on this pattern to fix the design flaw, instead of starting the facing at the placket edge, start tracing your facing at the exact center of the current placket V. The other end should be at the center back seam line, not including the length of the center back seam allowance. Make sure you do this with the dart still pinned closed. Include your seam allowance at the waistline.

 |
| The back facing without the back seam allowance included. |
Trace the following over your pants pattern piece. This will be a wide placket replacement, almost like a fly.


Above you can see the evil misleading gap of doom, and below you can see how the extension placket is stitched to one end of the yoke/ pants side, and it will close with buttons under the now bound edge of the placket opening.

More to come soon on cutting out your tap pants, yoke and facings, and other mayhem and whatnot.

5 comments:
Thank you so much for these sew-a-longs! I love your patterns and can't wait to finally get to sit down and make some unmentionables. These tutorials are so helpful!!
I absolutely love it when sew-alongs come complete with mayhem. It's always good to know what can go wrong (and that other people have problems with these things).
I am just finishing my first pair now, and have made every mistake you've mentioned plus a couple even more imaginative ones. I'll post pics tomorrow.
I know you're very busy with affordable manicures and such, but when does the sew along continue?
Yet again I'm sorry it should read:
I know you're very busy with affordable manicures and such :P , but when does the sew along continue?
Thanks for your information, it was really very helpful: Peaches and Screams
Post a Comment