Showing posts with label 1940's vintage. Show all posts

Wednesday, July 6, 2016

Using Evernote to Catalog Your Sewing Pattern Collection


Today, my dear readers, I'm going to talk a bit about keeping track of a large pattern collection. If you've been collecting as long as I have, you know that you can loose track of whether or not you have a specific pattern in your collection. More than once over the years, I've bought a pattern on Ebay or Etsy, only to realize later that I already have the same one in some box or other I've forgotten about.

Recently, at the suggestion of a friend of mine, I downloaded an app called Evernote to my iPad and tried cataloging 15 patterns to see how I liked it. This was on a Friday afternoon, and I liked it so much, that I then spent the rest of the entire weekend photographing and logging a vast section of my collection. It has taken me a while (months, really, the hoard is that big), but slowly and surely I have added my entire collection of sewing patterns and I am so glad that I did (more on that later).

(I'm just going to point out quickly that this isn't a sponsored blog post - I haven't been compensated for writing this, I just really love this app!)

The app is pretty user friendly and can sync across your mobile and desktop devices quite seamlessly once downloaded. To give you an idea of how handy that is, a few days ago, I was killing time in a doctor's office waiting room and scrolling through patterns on Ebay using my phone to pass the time. I found a great dress pattern and thought, I should buy that, but it does look a bit familiar... So I switched to my Evernote app briefly and typed in the pattern name and number, and sure enough, there it was in my collection! I saved $20!

The pattern in question... though having two of this gem wouldn't be the worst thing ever...
Before I go into the many benefits of having your collection catalogued, let me show you how easy it is.

Tuesday, October 14, 2014

How to Draft a Trousers Pattern - A Tutorial


Hello my dear readers,
This month I have really had trousers on my mind. A trip to Banana Republic where everything was lovely, expensive, and way too short for my long legs had me thinking, "I can make this! Why would I pay $100 for something that just won't quite fit right?"

I always do this. I call it the seamless loop. I want a garment, but it's expensive and I could make it if only I could make the time, which gets me thinking about how much my time is worth, how busy I am, and that I technically make enough money to treat myself to a lovely thing like that once in a blue moon. But I just can't justify buying it, knowing that I could make a better-fitting one... and it all goes through my mind for long enough that I get sick of it all and before I know it, I'm cranky, frustrated, and without either a purchased or handmade version of what I wanted in the first place. Have you ever done this? It sucks!
So I decided to break the cycle. I am drafting a few patterns to test out the fit, length, waist rise etc. until I have the perfect pair. 


I also decided that I would create a tutorial here in case any of you might like to try trouser drafting for yourselves!
Here's what you'll need:

Paper, long enough for your high waist to floor measurement plus a few inches more, and wide enough for 1/2 your hip measurement plus a few more inches. (a nice, 36" wide roll does nicely!)
Pencil,
Eraser,
Rulers, including yardstick or a tailors' square if you can get one.
A French curve, hip curve or other curve drafting tool.

And of course, you'll need your measurements! This tutorial is adapted from a 1940's/ 1950's trouser so you'll want to pay attention to your vintage sizing.


And now for how it's done!


I. - See illustration above.

A to B - Equals side length measurement.
A to C - Equals 6 3/4” for size 12
              6 7/8” for size 14
              7” for size 16 and up...

C to D - Equals 1/4 of hip measurement plus 3/4” for ease. Square this line across at C.
C to E - Same length as C to D. Extend line D-C to E; then pivoting at D, draw an arc line above E.
A to F - Equals crotch depth measurement plus 1” for ease. Mark point F on line A-B.
G to H - Equals hip line D-E. Draw this line through F, parallel to hip line D-E.
G to I - Square this line up at G through D, making this line 1/2” less than A to F.
H to J - Equals 1/2 of line F to H. Extend line G-H to J.
H to K - Equals 1/2 of line H to J.
K to L - Equals line G-I (center front) plus 2” for center back line. Draw this line from K to L, touching the outer most curve of arc line.
G to M - Equals length from K to J.
G to N - Equals 1 1/2”. Draw a diagonal line; then draw a curved line from D to M through N.
K to O - Equals 1 1/4”. Draw a curved line through O.
G to P - Equals length of F to B. Square a line down at G.
K to Q - Equals length of F to B. Square a line down at K.
P to Q - Connect for lower edge.
P to R - Equals 1/2 of line P to D.
R to S - Square a line across at R for knee line; then draw slightly curved lines from M to R and J to S for inner leg seam.
B to T - Equals 1”.
T to C - Connect.


II. - See illustration above.
Draw waistline slightly curved, from I to A to L. Reduce waistline to fit 1/2 of waist measure. First make part of reduction at sides and center front. Then make a dart in back and a pleat in front at follows:
C to U - Equals 1/2 of C to E.
L to V - Equals 1/2 of back waistline; then draw a V-shaped dart, 6” long.
D to W - Equals 1/2 of D to C.


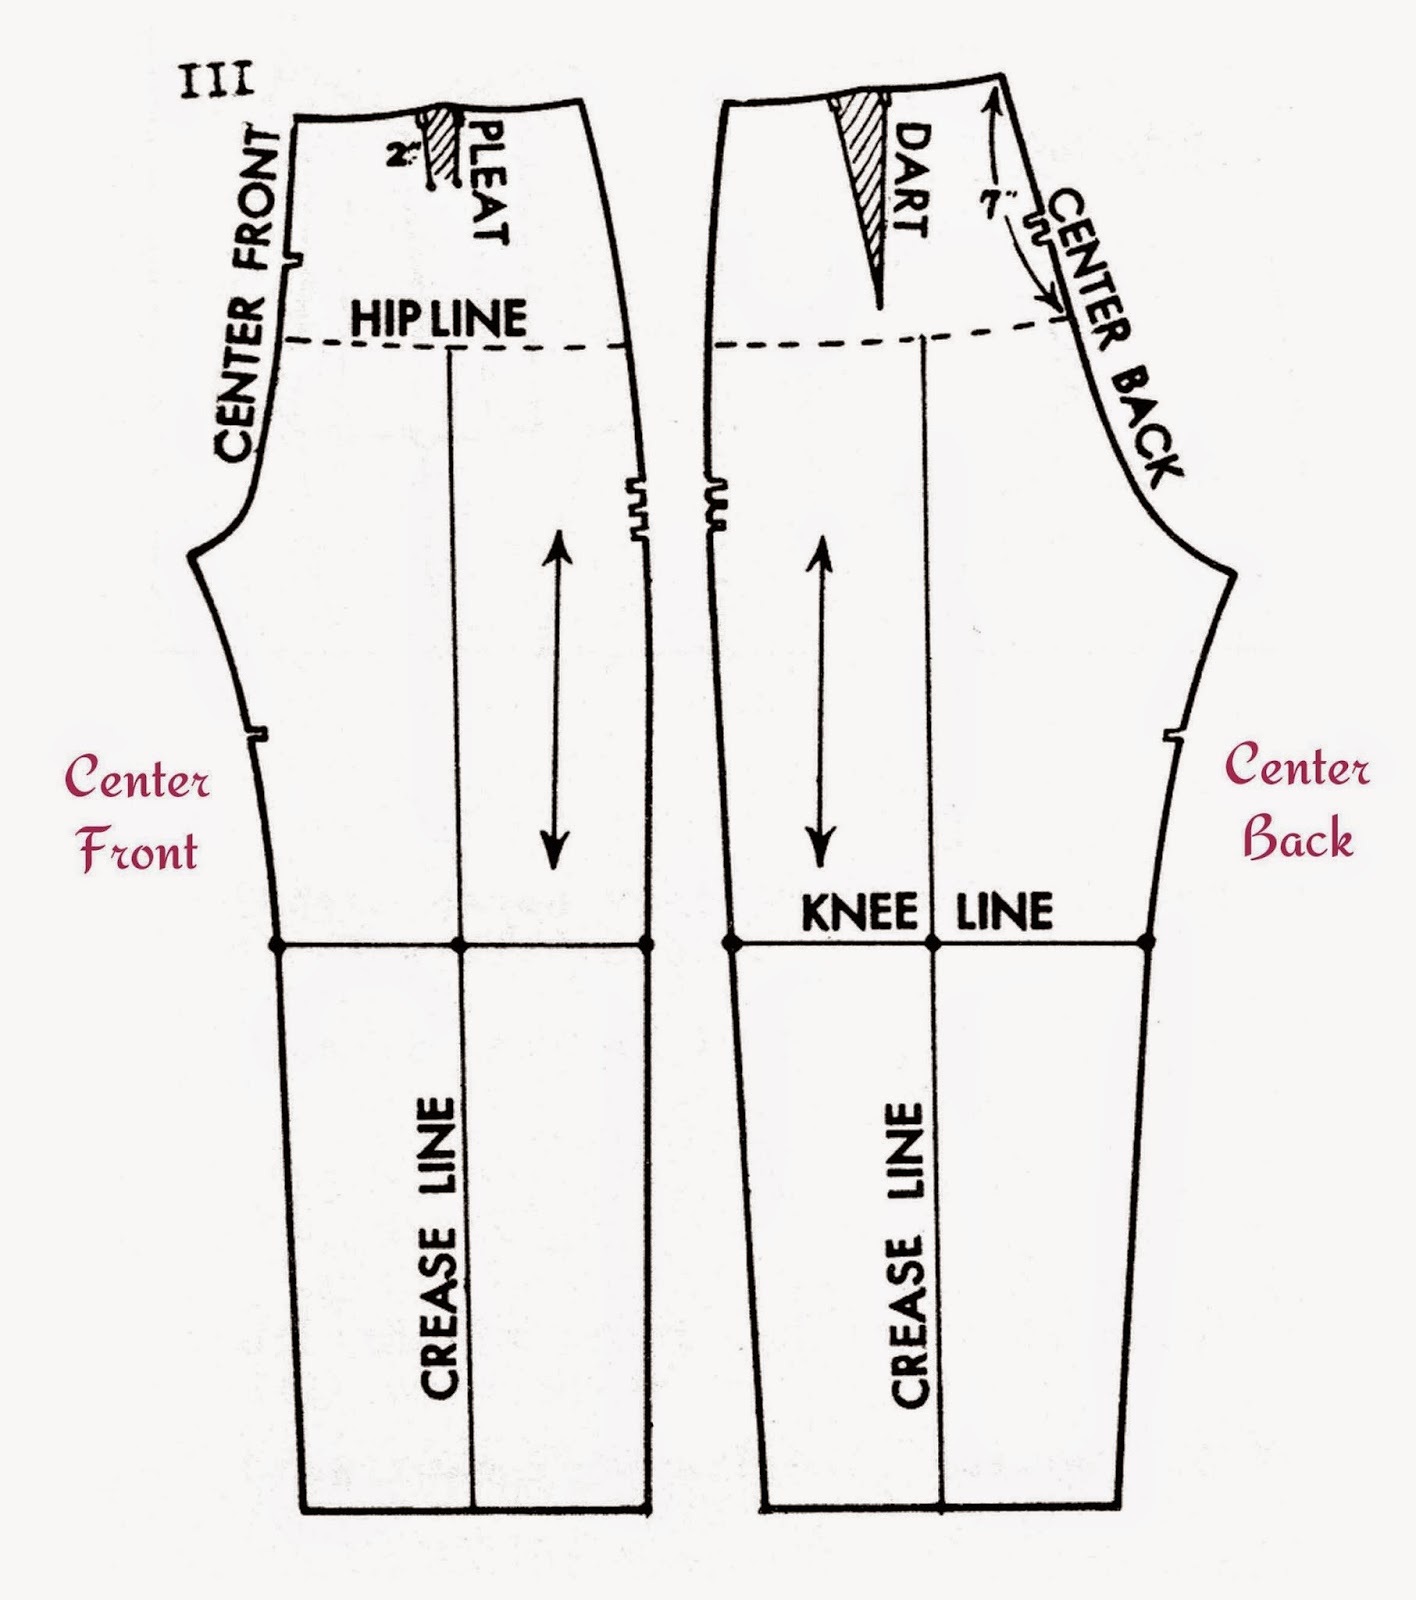
III. - See illustration above.
For crease lines on front and back, divide the knee and lower lines in half; then draw crease lines from bottom to hip line. For waistband, make a double band 1 1/2” wide, finished and the length of the waist measure plus 3/4” extension for left side opening. To complete pattern, add seam allowances to all pattern pieces and hem allowance to trouser bottoms. Make corresponding notches.


And there you have it! The straight waistband should only be used if you draft your pattern at waist level. If you lower it closer to your hip line, you'll need to draft a curved waistband.

Aaaaand on a completely separate note, I have decided to have a sale this week at Mrs. Depew Vintage! If there is a pattern you've been eying, now is the time to try it. Use coupon code "FLUFFEHKITTEH " in the box at checkout for a 15% discount - good until the 21st of October.

Happy sewing!


Thursday, June 7, 2012

Sew French: 6 November 1949

I'm back from vacation with epic jet lag and a head cold, but I've hit the ground running anyways. With my first post back from vacation I'd like to start with a new segment I'll be doing here on A Few Threads Loose called "Sew French".

I have an amazing collection of vintage French sewing magazines and patterns and since I get so much enjoyment from them, I thought I would share bits of pieces of them with you.

Today I would like to share some lovely images and sewing patterns from "Le Petit Echo de la Mode." This edition was printed November 6, 1949.


It has lovely fall fashions and focuses mostly on really beautiful coats (and dresses) like these:


Sewing patterns for all of these fashions were available to order by mail. They are harder to find but I just love French patterns from this era; the styles are so timeless.

My favorite image from this edition is below, showing the latest style of accessories in suede.

Translation: "Suede in your adornment."
And of course, I have for you the two patterns included in the issue which I have given a "digital bath" as I like to call it.

 The first below is "Paniers et Corbeilles" or "Baskets and Trays." The measurements given for these are in centimeters.  If you don't read French and need the instructions, you can use Google Translate to make some sense of it.


This second pattern translates as "The baby area" and includes a "sleeping sack," "bags for hot water bottle and bottle" "a mat" and most interesting of all, a "walking belt" to keep the wee one from wandering too far on your daily promenade. Essentially it's a toddler leash.


Are these as fascinating to you as they are to me? Would you make any of these things? I would love to know! I have so much fun digging these things up.

I hope you have a lovely weekend.
~Anna~

Saturday, February 4, 2012

Gorgeous Lingerie in Hiding

I'm not feeling too great today on a new medication so I'm going to keep this short and sweet. While I've been tucked away on the couch, I've been using my ipad for my usual search for vintage lingerie and sewing patterns.
Here are a few goodies:

This is a to-die for 1920's night gown pattern that I've had my eye on for a while. If only I didn't have too long a to-sew list already...

Vintage Sewing Pattern 1920's Slip Gown Mail Order Lingerie Pattern Ideal 713

This nightgown/ lingerie set just makes me swoon, and even manages to make bloomers look sexy in a revealing sheer gauze.

RARE 50's Vintage McCall's Sewing Pattern 3029 - Nightgown, Petticoat & Panties - UNCUT - size 14/32

If you're into knitting, then this great reproduction booklet for sweet little underthings is right up your alley.

Weldon's 6D Knitting Series (5) c.1939 - Vests & Pantie Sets, Ladies' Vintage Lingerie in Knitting

Thinking of lingerie always has me looking for bras. This time I was looking for the 1920's and I found this great little brocade bra. I love how the brocade is sateen and how the rounded top looks a bit like a sweetheart neckline.

Vintage Bra Deco Era Cotton Sateen Brocade Bralette

And last but not least whilst we have bras on the mind, Sew Vera Venus is offering a giveaway for her recently developed 1940's bra. This design is pure genious and I can't WAIT until it's available for purchase.
Photo from VeraVenus.com

I'm dying to know how she does that lovely little stitched pointed V. Swoon. You can click on this link to leave a comment to enter the giveaway.

Have a happy weekend, mama's off to go mix alcohol with pills. Cheers!

Sunday, December 11, 2011

Oh Yes Please!

Many of us are of the opinion that we were born in the wrong era. Some of us long for the good old days of Jane Austen when one's biggest problem was finding a husband. Others long for the roaring 20's when being a bad girl was still something new. And lots of us long for the 40's. Wartime, yes, but a time when family values reigned supreme, the fashion was 'tops' and the world had something worth-while to fight for.

I'm with the 1940's school, and my opinion is only reenforced by what I have to show to you today.
Ladies, I give you the era we ALL should have been brought up in:


Saturday, December 10, 2011

Check Out My New Purse, and a Giveaway!

As most of you know, I'm very fond of my mail call posts and I love to show off the goodies I get in the mail so often. Today I'm particularly excited to show you what I've gotten, because it comes with a GIVEAWAY!
Readers, I would like you to meet my new purse. Purse, meet my readers.

Hi, nice to meet you.
You might remember me gushing over this purse when I was on the quest to add more fur to my life.


 This sweet creation is the pièce de résistance of Sherrill from Vintage4Creations.


Here's what I like about it. The sewing is excellent. I looked over every detail on this little gem when it arrived and have every confidence that this purse is sewn to last a lifetime.


I'm of course thrilled with the fact that it's made from an up-cycled vintage coat and fur, and the button detail delights me to no end.


The best part? Sherrill cleverly included an original pocket from the coat into the side of the purse and it's the perfect size for my iTouch!


Before we get to the giveaway by Vintage4Creations, let's get to know Sherrill.

Friday, December 9, 2011

Modes et Travaux ~ December, 1949

Today for your eye candy super happy fun time I have pictures of the very best that  Modes et Travaux had to offer in fashion, sewing, and hand work in December of 1949.

I was elated to win this edition on ebay because the cover is a beautiful sketch of a creation by none other then Christian Dior.

A white evening gown by Dior with the illustration by Artist Pierre Mourgue.

Does it get any better? Does it? Nope. Ah this dress, the stuff of dreams. I immediately set out to find photographs of it, and I'm still not sure I have the same dress but here is a photo of a Dior gown from 1949:
Lillian Bassman, Fantasy on the dance floor, Barbara Mullen, dress by Christian Dior, Paris, 1949. photo courtesy Phillips de Pury & Company
There isn't anything in the actual magazine about the design on the cover (what?!) so moving on we can see the lovely full-page advertisements that the magazine starts out with.


Thursday, December 8, 2011

Lingerie Sew-Along: Final Touches and the Finished Product, Part 15

Well, crap. The sun just isn't going to shine here, and without it's cooperation, any pictures I take of myself in the Pauline slip are just going to be dark and scary.
So let's just finish up the Lingerie Sew-Along, shall we?

When last we left off, we finished the side seams, the bodice facing, and we bound the top edges.

As far as the bodice facing edges on the inside are concerned, they can either be serged together with the bodice seam allowance, bound, or just basted together. The point is just to keep the inside facing from bunching up inside your bodice and creating unsightly lumps.

The inside bodice facing edges, pinned and ready to be dealt with.
Next we have the straps. They can be done as detailed in Pretty Pretties or as we discussed in the post about sewing straps to the Pauline Bra.

Tuesday, November 22, 2011

Lingerie Sew-Along: Bust dart and Gathers Part 13

 For our next installments in the Lingerie-Sew-Along we will be working on the bodice pieces, darts and optional gathers, and attaching the bodice pieces to the slip pieces.

To see how to sew a dart, or just to get a look at how the same three darts looked in the Pauline bra pattern, click here.

You have two options with the bodice pattern pieces for this slip. You can either sew the darts as instructed, or you can replace the bottom 3 darts with gathers. I have chosen to use the gathers as the fit is more forgiving to the bust contour, and the gathers provide the illusion of fullness at the bust (and let's face it, I can use all the help I can get in that department.)

There are 4 darts on the bodice piece, the single one at the top, and the set of three at the bottom. Sew the dart at the top as you normally would.


Monday, November 21, 2011

Lingerie Sew-Along: Starting the Slip, Cutting, and Contour Darts Part 12

 It's here! The final leg of the Lingerie Sew-Along is upon us and once again, I'm so sorry it took so long for me to make this part happen. Within a couple of days of getting back from the U.S. my camera went missing and my brilliant husband just now found it. We couldn't have a Sew-along without a camera so here we go!

I've been working all weekend to get this baby mostly put together and I've really been enjoying it. It's a nice and straight forward pattern and it feels SO good to get behind my machine again.

Printing: Make sure your printer is set to scale to 100% when you print!
Remember that the original vintage pattern didn't include a seam allowance so you need to make sure you add this before cutting out your pattern pieces.

Let's start with cutting out our pattern pieces, shall we? I chose to make the long version of the Pauline Slip/ Camisole. To make the camisole instead, just cut the pattern short at the lines indicated before laying it out on your fabric. The rest is the same.
Below are my slip pieces laid out on 2 yards of some great navy charmeuse I found at a thrift shop in Nebraska this summer for $1.

Fabric Requirements:
36 inch fabric:
Slip 2 1/8 yds.
Camisole 1 3/8 yds.

Cut out the following:
Slip front, 1 on fold
Slip back, 1 on fold
Bodice, 2 of shell, 2 of facing or same fabric.

Slip pieces laid out, both on the FOLD.

I chose to make the bust pieces in a contrasting white; I'm using a vintage silk handkerchief for fabric. I fell in love long ago with a 1940's vintage slip in blue and white and made the mistake of waiting to buy it. I missed out so this will be my copy.


Once you have your pieces cut out your next task is to mark, pin and sew the darts in your slip back piece. We'll start with the back darts because they are the trickiest. These are known as contour darts and are designed to fit the fullest part of the back and hip nicely.


First mark the darts well; how you do this is up to you but for a contour dart, I recommend a chalk line as it's so much easier to match up the lines.

Saturday, November 19, 2011

Longing for more fur in my life

Living in this cold, icy, god-forsaken winter wonderland of a country has led to a bone deep need for warm, comforting, and fluffy accessories. Some of my go-to wardrobe choices include a hand beaded wool scarf, vintage fur detachable collars, fur lined boots, and various mink and ermine neck warmers. l'm sure you can see where this is going.


With this season in fashion adding fur touches nearly everywhere, it has become glaringly obvious that I need to add a fur purse to my arsenal of accessories.
I had a brief debate with myself over sewing or buying one but it all boiled down to the fact that I have enough sewing projects on my plate as it is.

So I set out on the hunt and I thought that I would share some of my favorites with you.
I was really in love with this mink bag but let's face it, a military wife just can't go and spend $349 on a purse.
So I started looking at vintage and my options got a bit less expensive...until they got more expensive when I stumbled across Hopcotch  Couture and their AMAZING upcycled purses:

Hopscotch Couture

Thursday, September 1, 2011

Bathing Beauties, and the winner is...

I have the internet working! We've been moving into our new house and they just connected the darn thing. But enough of my drama, you want to know who the winner is, don't you?

The winner as chosen by the random number generator is commenter #11,  is Holly!
Congratulations Holly and thanks for sharing what makes a swimsuit perfect for you!

"what i look for when i'm buying a bathing suit is basically the suit i had between the ages of 13 and 15. it was perfect. it was kind of 1940-50ish (i thought.) two-piece, white and navy blue polka dots and stripes. the bottoms were belly button high and included loose shorts that gave the impression of being a skirt without the fuss of floating up in the water. the top was a halter and gathered in the middle. i wish i could remember the brand because i would HUNT IT DOWN. i think i got it at dillards. i should figure out how to make that suit."

 
 I think we can all relate to having had that ONE swimsuit that made you look and feel amazing, and wishing you could go back in time and buy 5 of them at once. So Holly, you can email me at afewthreadsloose@gmail.com and I will send you your pattern!

For those of you who still want the pattern, it's a mere $5 in my etsy shop.

On another happy note, I'm decorating the new house like a mad woman, trailing fabric swatches around the house and giving my sewing machine quite the workout. We have wonderful new black leather couches and I'm getting ready to sew some pillows to make the room POP. My fabric is silk dupioni in iridescent jewel colors. I'm going to alternate between these two colors:


What do you think? 
There will be a twist, of course... here's a hint: 


This is my practice run in micro-suede. I see a lot of applique in my future.