Showing posts with label 1940's. Show all posts

Thursday, April 6, 2017

Next Level Nerd - McCall Sewing Pattern Dating and Collecting Resources

Collecting sewing patterns can be a really fun (and expensive) past-time. One of the most fun aspects of this can be hunting down more information about a particular pattern. This can be done a few ways but the best way to find out more about a pattern is to find publications from the pattern company and see if they feature your pattern.

I found this McCall 1738 doll pattern in a 1929 McCall Quarterly. A few days later, I found the French Boudoir doll the pattern was made for at an estate sale! Pattern Nerd heaven!

In addition to printing monthly Style News flyers handed out free at dry goods and department stores, some companies also printed quarterlies that were available for purchase, as well as counter catalogs to have on display in stores.

Some companies also had their own monthly magazines in which patterns were advertised along with novel installments, home decor and homemaking articles, and news. Other companies partnered with magazines already in publication to advertise their pattern in the fashion section.

This post will focus on the types of pattern advertising used by McCall Patterns.


Counter catalogs could be found in stores at the pattern counter, much like they are today. They were often 100-600 pages of fashion eye candy. These are extremely rare and highly sought after as many were simply thrown out every few months.

McCall Catalogue of Complete Designs July, 1930.

The sister catalog to this was the McCall Complete Catalog of Designs, also to be found at the pattern counter, but featuring needlework and accessories. These for some reason are easier to find and are worth 1/10th of what regular counter catalogs go for.

McCall Quarterly Winter, 1925.


McCall Quarterly was an average of 60-100 pages in length and had the distinction of advertising patterns that were based on couture designers - these names often didn't make it printed in the catalogs or on the pattern itself, likely to save on licensing fees. These were published from approximately 1920 to 1931.
You can find reproductions of some of these for download here.

McCall Fashion Book Mid-Winter 1932-33


In 1932, McCall Quarterly was renamed McCall Fashion Book and was published quarterly and sometimes bi-monthly as such until the late 1930s.


McCall Style News was created monthly by McCall and a template was sent out to department stores that carried the patterns to be printed at their own expense and given gratis to customers. These will often have the store name printed at the bottom. I have seen these as early as 1924 and as late as the 1970s.

McCall's November 1928.

McCall's November 1928.

 McCall's Magazine started out in 1873 and was Originally Called The Queen. In 1897 it became McCall's Magazine - The Queen of Fashion and was later shortened to just McCall's.
Published monthly, it is a little utilized pattern dating resource, but a really great one! These often included fashion pages illustrated in mostly color, about 4-14 pages worth! In the 1920s McCall Magazines, couture designer names are often mentioned with the designs - this is my favorite way to find out if a pattern was created by a couture designer or not. I even found out from a 1928 magazine that one of the patterns in my collection was a House of Worth design!

Page from 1925 Autumn McCall Needlework

McCall Needlework was published starting in the early 1920s and was often bi-monthly. While McCall Quarterly focused on clothing and accessories, vintage McCall Needlework focused on patterns for embroidery, pillows, aprons, hats, gloves, toys, curtains, smocking, needlepoint, and cross stitch to name a few.

Other pattern research resources you might find useful:

How about you? What is your favorite method for researching and dating sewing patterns?

PS. New in pattern happenings this week: The Vintage Sewing Pattern Nerds Facebook Group has opened its own Facebook Pattern Selling Group. Vintage Pattern Nerd Boutique is a great place to buy or sell rare patterns without fees and commissions so stop by and check it out!

Happy sewing,


Saturday, November 7, 2015

1940's Bra Sew-Along - How to face pattern pieces and lining options.


Happy weekend, sewers! Ready to do some more bra sewing?

In our last post we talked about adjusting our cups sizes. Since I haven't gotten any more fitting questions from you, we're ready to move on.
Today we need to talk about lining options. What should the inside of our bra look like? Well, there are three methods of lining I have used in bra sewing in the past and one is far superior to the others.
The first is fully lining the bra. As I did with my bra #2001 for the Oooh la la Pin Up Sew-Along, you sew two complete bras (minus straps and closures), one of lining and one of outer fabric. Then you sew those two pieces right sides together all along the bottom seam and then bind the top edge. You can also sew the entire bra together at top, bottom and edges, leaving a gap to and turn the bra right side out. This conceals all of your raw seam edges. This can lead to some of your seams shifting a bit and if you have thin fabric, seam edge shadows can show up all over the place.

From a 1940's Brassiere in Profile - the edges here have been turned under and stitched, or faced with a piece of cotton tape.
Another technique is to sew one bra without lining, but of at least medium-weight fabric, and simply bind or turn the raw edges under as done in the bra above. By far though, I prefer to face my pattern pieces and use top stitching and rayon or cotton tape to finish my edges. This is the closest I can get to a historically accurate bra from the 1940's without hunting down some cotton-backed satin (seriously, it's hard to find!).

So to do this, simply cut the entire bra out from your outer fabric (I'm using white satin from our kit), and another entire bra from your lining fabric - I like fine cotton lawn or muslin for this.

Pieces C in satin and cotton, ready to be pinned.
Lay the lining pieces wrong sides together onto your outer (satin) pieces and pin them securely in place. You'll want your right sides to the exterior for this step.

All pattern pieces in cotton and satin, pinned wrong sides together.
Carefully baste each set of pieces together only along the top and bottom edges about 1/8" from the edge.


You will want to leave the left and right edges (side seam, center front and center back edges on all pieces) un-basted. If they are basted at all edges, this can lead to some creases and bunching that won't sit well on the sewn bra.

--Update: This method is a good one to use if your fabrics aren't prone to fraying. The satin I'm using doesn't fray very much so I'm comfortable with having a trimmed, top-stitched, but unconcealed raw edge inside my bra. If you want a more finished appearance on the inside, then you can either fully line the bra as mentioned above (instead of just facing your pieces) or you can finish the raw edges of each seam with either a serger or an edge stitch (a blanket stitch was very common on curved bra seams in the 1940's).

Here is the interior of my bra using the facing/ top-stitching method.

And now you're ready to sew your actual bra together!
Any questions about lining, facing or binding?

Happy sewing,


Friday, October 16, 2015

1940's Bra Sew-Along, and a Sewing Pattern Giveaway!


Update: This giveaway is now closed.

Well, my dear readers, it's that time again. I have the lingerie sewing bug. It's been ages since our last sew-along and I'm happy to say that my schedule has cleared just enough to allow me to host another one!
And the pattern I would love to make with you is my absolute favorite bra pattern, Depew #2013.

1940's style bra pattern Depew #2013 32"- 44" Bust.

I just most recently made this bra up in white satin and it turned out so beautifully, I thought, "Every girl should have one of these!" I wore this bra ll day yesterday under a semi-sheer top and it was so comfortable! I even had a lady approach me at a shop and say, "This is going to sound weird, but where can I buy a bra like the one you're wearing?" It seriously made my day.

Sadly you can't get a bra like this in stores anymore but I've had something in the works for a while now to make sewing your own easier and a bit more fun.
I've been working for months now to grade this pattern into many more sizes and have also partnered with Take & Make to offer a complete bra sewing kit with everything you need (including the pattern download) to sew the bra pictured below.

The bra sewing kit for pattern #2013.

The kit includes ready made straps and plush hook and eye closures that have been carefully matched with soft white satin, thread, and enough fine, soft muslin to sew a test version, with enough left over to line the bra if you should so choose. You can find the complete kit here.


We decided to go with white satin for the kits so that finding matching underwear wouldn't be a chore.

In one of my most recent posts we looked at an original 1940's bra to study the sewing details used. I'll be including these kinds of details in our sew-along posts and hopefully we'll all get to learn something new.

Top-stitch details are almost a must for any vintage bra!

And of course, this would be no sew-along launch without a giveaway! Next week I'll choose three winners from the comments on this post who will each get a digital copy of the bra pattern we'll be using.
To enter the giveaway here on A Few Threads Loose, simply leave a comment on this post letting me know you're in!

For an extra entry, you can do any or all of the following, just leave a comment letting me know about it!

I'll announce the winner of the giveaway on October 23rd and then we can start gathering our materials for the sew-along.


Happy sewing, and best of luck to the entrants!


Friday, November 7, 2014

Make your own... Lingerie and Loungewear from 1949.


Hello lovely readers! Today I was browsing my collection of vintage editions of Le Petit Echo de la Mode and I stumbled upon this lovely fashion spread from 1949 featuring trousseau lingerie and lounge wear.


These designs were once available as mail order sewing patterns (oh, to have such a magazine delivered to your mailbox!). I realized though, as I drooled over these patterns, that I have quite a few similar designs in my shop.


So, I thought I'd share today, how to get the 1949 looks pictured in the magazine using patterns from Mrs. Depew Vintage!


1. Bra in Satin - Easily copied using Depew #2015.
2. Panties with gathered waist - Use Depew #7311A and add allowance to the waist for gathers.
3. Corselet - Use Depew #2003 and add a top-stitch motif to the center front.
4. Basic straight slip - Use Depew #604.
5. Rayon bra with lace trim - Use Depew #352.
6. Corselet with wide lace ruffle - Use Depew #2002 and finish the lower edge with 6" or wider lace trim.
7. Tap pants with gathered side panels - use Depew # 612 and add side panels as cut-outs to the side legs.
8. Slip with ruffle - Use Depew #7314, cut it shorter at the hem and change the neckline as needed.


9. Slip with ruffle and tap pants with ruffled leg. Slip - Use Depew #7314. Tap pants - Use Depew #7314B.
10. Dressing gown - Use Depew #5003.
11. Pajama set - Use Depew #354 or Depew #601.
12. Pink dressing gown - Use Depew #5004 and replace cuffs with lace.  Blue nightgown with lace trim - Use Depew #171.

In other sewing news, I was really excited to learn yesterday that Collete Patterns will be releasing a digital sewing magazine starting in December! Seamwork will feature articles, sewing tutorials, and downloadable easy-to-sew sewing patterns. I really enjoy reading the Coletterie blog and I know that the magazine is going to be even better!

Image courtesy of Seamwork and Collete Patterns.

To get updates on Seamwork's progress, writers, and patterns, and to be entered to win a full year's worth of patterns in the process, sign up here!

Happy sewing, my darlings...


Monday, September 9, 2013

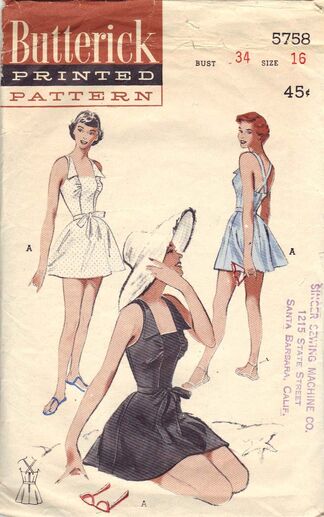
Sew Expensive... Butterick 5758 Bathing Suit Pattern


A while back, I was watching a great bathing suit pattern on Ebay. And of course, it sold for an amazing sum so I set the info aside for a rainy day... it's not exactly raining but my studio is still wall to wall with boxes so this is a good time to blog about some patterns!

Are you ready for it?
This lovely original Butterick 5758 from 1951 sold for an amazing $145.98.


Take a look at those lovely details! This is no simple skirted bathing suit. Notice the lovely gathers at the princess seam over the bust and the clever turned back collar formed, it appears, straight out of the criss-cross straps! It's tiny little details like this that set this pattern a head above your average vintage skirted bathing suit pattern. On a side note, I should also mention that Butterick bathing suit/ playsuit patterns always seem to be a bit more scarce, and in my opinion, this drives the price up a bit.
(You can see pictures of the Butterick Pattern flyer advertising this, and other great patterns courtesy of Cemetarian here.)

For those of you waiting for a great bathing suit pattern that don't have that kind of bank laying around, here are a few options that might work more in your favor.

Depew 1001, available in multiple sizes.
Depew 1002.
Available in a size 16 on Etsy at FancyWork, $55.
Bathing Suit Reproduction By New Vintage Lady on Etsy, $25.
Available in a size 14 at Glass of Fashion on Etsy, $59.99.

I know, many of you are thinking that summer is just about over for you. Summer has apparently just begun in Monterey (what fun! different seasons to learn!) and I can't get trips to the beach off my mind!

Thursday, May 2, 2013

French Knickers Sew-Along... Embroidered Touches


Hello lovely readers. Today I want to chat a bit about finishing touches on your French Knickers... or any lingerie for that matter. Many of you know that I'm constantly inspired by my collection of vintage lingerie and lingerie patterns. My biggest source of inspiration is lingerie from the 1920's. I feel that the handwork details, fabrics used, and styles are all easily accessible to the modern seamstress.

vintage bra and panties sewing pattern from the 1920's

There are no scary under-wires, boning, and not too many elastics to worry about. The styles are so simple to sew that more time and attention can be payed to tiny details like lace applique and embroidery.
vintage 1920's embroidered camisole, lingerie embroidery
1920's Lingerie Top Via Etsy shop The Paraders.

My goal in creating my own lingerie has always been to reach a point where I can skillfully make some beautiful, new or vintage-inspired pieces of lingerie for my own enjoyment using techniques that I've learned from my exploration of vintage pieces.

Here are just a few of the amazing pieces that inspire me to keep trying:

vintage 1920's embroidered camisole, lingerie embroidery
Vintage Camisole Via Etsy shop Rococo Vintage.
Vintage 1950's embroidered silk nightgown, lingerie embroidery
1950's Nightgown from the Metropolitan Museum of Art
Sigh... some day I'll be that good. Then I'll make something like the above and be too chicken to wear it in case I hurt it.

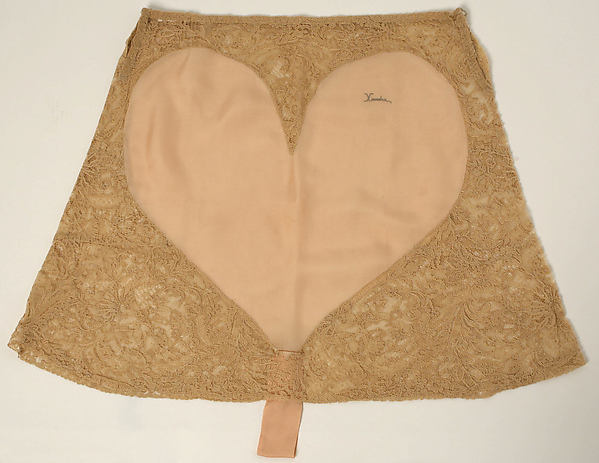
Vintage lace and embroidered tap pants from the 1920's
Tap panties from the Metropolitan Museum of Art

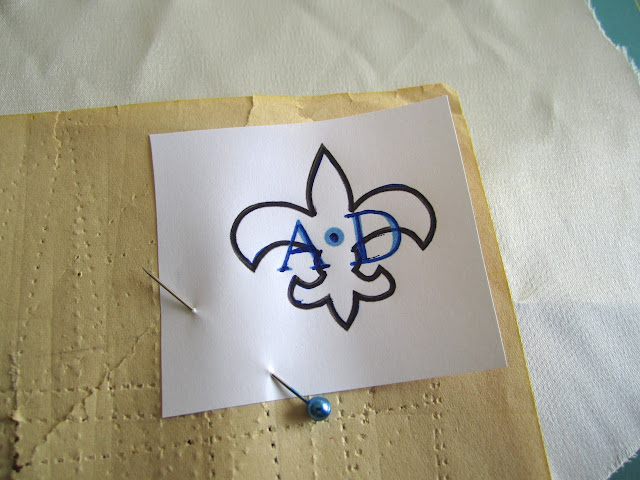
I especially love the use of embroidering one's initials or name into beautiful handmade lingerie. So I decided to sign my work. I set to work in Photoshop with a basic fleur de lis, played around with size and fonts, and came up with a basic template that I could trace onto my fabric and embroider.

Embroidery transfer, how to

I used some transfer paper scraps (look for them at your local thrift shop, so handy!) over a scrap of satin, with my printed test image over that, and traced over it all with a pen.

Pardon the ratty fabric scrap and the horrible photo... I still have no lights in my studio!
 It's definitely a good idea to do a practice version first on the same fabric as your lingerie piece... my practice run was o.k., but I found that the blue silk embroidery thread I was using was just way too thick for my fabric. (I'm still learning! If you'd like to bombard me with embroidery tips, I'll take them gladly!)

Not too great, but it could have been worse :)
 I switched threads and with a bit more care this time, embroidered the same design (minus the center French knot) onto my lace and satin knickers from our last post. It came out much better!

Fleur de lis embroidered monogram, lingerie embroidery

I used a simple back stitch to embroider the whole design. I'm no pro so I won't preach at you about embroidery technique, but here is a great post at Sublime Stitching that shows you this super easy stitch.

Fleur de lis embroidered monogram, lingerie embroidery

And voila! This was really quite easy for a novice embroiderer myself so I strongly encourage you to try it for yourself! Embroidery is so soothing!

Do you plan on adding any other little touches to your French Knickers or other hand-made lingerie? Or do you have a favorite piece of clothing with a tiny, beautiful little embellishment that makes it just that much more dear?