Showing posts with label bias binding. Show all posts

Monday, March 5, 2012

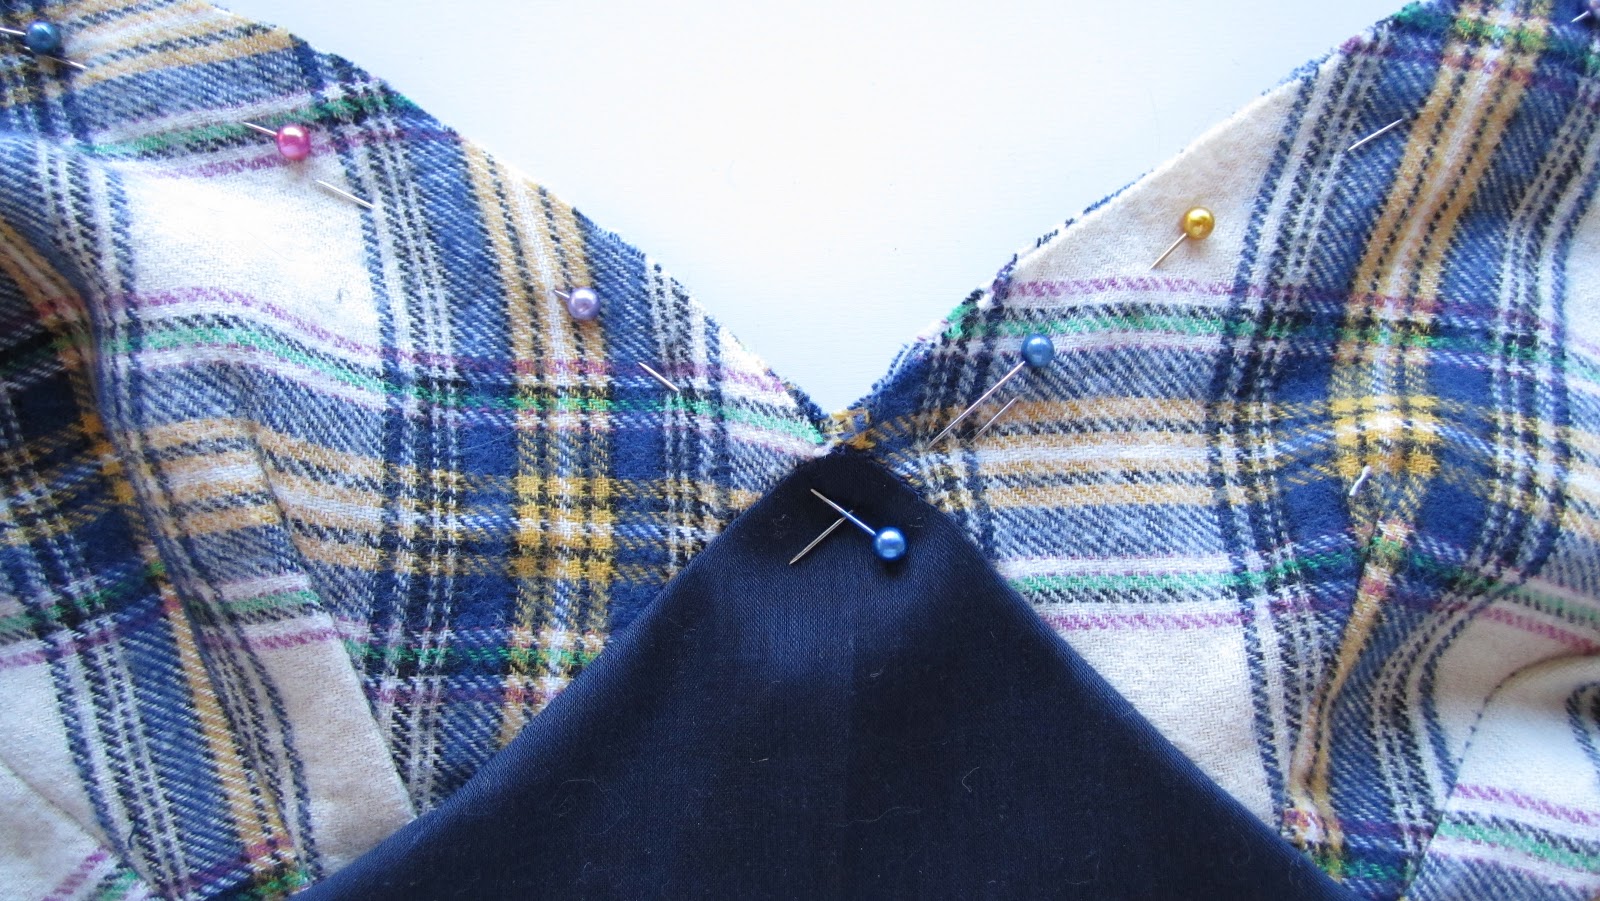
Bias tape: binding an inverted corner.

 For the Ooh La La Pin-Up Sew-Along we just finished binding our top and bottom corset edges. If you want to know how to get a sharp point (as opposed to a softer, rounded look) on the inverted corner in the center panel, here's a good technique to try.


My practice corner, an exact copy of the inverted corner in the corset center panel.
This will involve sewing a pre-made corner into your binding so measure out the binding you need for the bottom first (then add two 'in case of error inches" to that.)
I suggest making a practice piece first like I have here to test out and get comfortable with the idea. 


Ooh la la Pin Up Sew-Along... Binding your edges.


The pattern we're using...

Today for binding your edges, Sarah put together an excellent post for us. Her explanations are so nicely put together that there's not much for me to add! Her method is a really great way to control the quality of the binding that goes on. There are so many ways to bias bind an edge that we really don't want to overwhelm you with too much info here. I prefer to sew mine on completely by hand because crazy, unnecessary hand work soothes the neurotic person in me. You really don't have to do it that way.

~Sarah~

Before you get started, make sure you have inserted all of the bones you plan on using, and have tested the fit.
For your binding, you can use purchased bias trim or bias trim made of self or contrasting fabric.  I'm using the same pink satin as I used to cover my bone casings.  I am cutting bias strips 1 1/8" wide, and pressing my folds prior to stitching.

Baste your bias tape in place, leaving a little overhang on each end as pictured above.

Saturday, March 3, 2012

Ooh la la Pin Up Sew-Along... Embelishments: Hooks and eyes can be pretty too.


When I last posted about the corset we had just finished sewing our hook and eye tape to the corset back. Now, here's how to make it pretty.


I chose to bind the outside edges of my closure with cream satin bias tape. This was too small a place to get a sewing machine needle into, especially with the hooks and eyes in the way, but that's ok. I really prefer to sew bias binding on by hand. I feel like I have better control over where my stitches go and how they look on both sides.

When we first moved to Norway, I made a newbie mistake and plugged my sewing machine into the wrong end of my electric transformer, blowing the electric part out. Gertie of Gertie's Blog for Better Sewing and her great readers helped me out in this post by suggesting all sorts of hand sewing projects I could do to stay busy until my machine was fixed.
I ended up sewing several projects completely by hand including an amazing silk blouse and now I consider hand stitching to be an incredibly soothing and rewarding pastime.

If you choose to bind our edge as I have done, make sure that you keep your stitches under the eyes, and that the stitches directly under the eye are split in two, just in case the hook catches, it will be anchored well there.


I bound both edges like this and then it was time to add boning again. I agree with Sarah completely when she said that if you add boning anywhere to the corset, you really need to add it to the back.


It depends on what type of hook and eye tape you have but sometimes there's a channel already hidden behind the hooks and eyes that's perfect for boning to slip into. If there isn't such a spot in your case, then don't worry! There should still be a gap between the back of the hook and eye tape against the corset fabric.


Here's my bound and boned hook edge from the outside.
For a little added embellishment I added a length of purchased ruffle trim to the back of my hook side. I just carefully slip-stitched it in place. The top and bottom ends will be nicely bound when we finish the rest of the corset binding.


Next up comes binding the top and bottom. If you've done any quilting, I'm sure your bias binding techniques will come in handy in this part!
With any luck, my garter clips will get here soon and I can finish this little beauty.

How is everyone doing so far? Are you behind or ahead of Sarah and I?
Keep in mind that there's no deadline, no homework due, and you don't have to keep the same pace as anyone else. This is to make sewing lingerie easy and fun for you, on YOUR terms!

Thursday, October 13, 2011

Lingerie Sew-Along: Binding the top of the bra, Part 4

First off, for those of you who are interested in a fascinating blog post on the 1940's style bra silhouette, check out this very well researched post on By Gum, By Golly.


Photo from By Gum, By Golly.
We also had a good question yesterday about darts: after resizing her bra pattern to allow for a larger bust size, Xye asked: Anna! Where is the top dart supposed to lie? Mine is pointing the dart nearest the side/furthest from centre - so not central to bust point? And how far from centre back should the tapered point of the upper bra piece end? Mine is ending about 2" from centre back (I think, while squinting and half turning to look in the mirror!). Thanks!

This is a great question! Xye, your top dart is in just the right place! Good job! The back sounds about right too. On mine it is about 2 1/2" from the center back, but this will vary a bit depending on whether or not you extended the back, and how much stretch your bra band fabric has on the bias.

And now on to binding the top of the bra:


When last we left off, we had just finished creating a separate outer and lining. Place the outer and lining pieces WRONG sides together.

Outer and Lining Wrong sides together.
Start by matching the center front and pin a few pins to secure them together.


Pin the center front of outer and lining WRONG sides together.