Monday, January 28, 2013

Sew Expensive... McCall 9124


 I have a weakness for evening gown patterns. I haven't the foggiest idea why since I never sew them, and never have anywhere to wear them, but I adore them nonetheless.
But this obsession gives me an excuse to stalk Ebay for the occasional beauty, and it gives me fuel for our latest "Sew Expensive."

Today for you I have McCall 9124 from 1937. This beautiful low-backed gown has lovely slightly flared skirt and a modest but elegant front.

But I'm sure you're quite interested to know what it sold for, aren't you?


McCall 9124 recently sold on Ebay for a very believable sum of $285. I'll bet it was worth every single penny.
It would have been ridiculous for me to have spent that much money on a pattern I'll probably never use.
That doesn't stop me from wishing I had anyways.
How about you? Do you have a favorite evening gown pattern?

Saturday, January 26, 2013

Lingerie Sewing Inspiration

To those of you who have finally found time to try the Sew-Along patterns, or those of you who are getting ready to photograph your lingerie for the competition, or even those just inspired by lingerie, here is a little collection of my favorite lingerie/ boudoir photographs on Pinterest.

Is it just the competition that has me in the mood for lingerie photos, you might ask, or something more? Definitely something more. Friday I had the privilege of working as a model for the most talented photographer and stylist team a girl could ask for, posing in my own lingerie designs. The process was long, exhausting, and the funnest thing I've done in years!
There will be more on the whys and hows of that later when I can show you all some finished photos but until then, know that I am sore, and that it was worth it!

Without further ado, here are some of the photos that inspired us all for the shoot:

Sorry, no photo credit, the Pinterest Wild Goose Chase led to nowhere.
Via Kissthegroom.com
Photo: Barbara Palvin
Sorry, no photo credit, the Pinterest Wild Goose Chase led to nowhere.
How about you? Have you thought bout participating in the lingerie competition? Do you have any reservations about posting your lingerie for the world to see, even if you're not in it?

Tuesday, January 22, 2013

Ohhl La La Sew Along: A Competition with Prizes!

Hey, remember that Sew-Along we did a long time ago? The one with all that lovely pin-up style lingerie?


 A lot of you participated, over a hundred of you in fact. It was awesome! But very few of you sent Sarah (of Ohhh Lulu) and I pictures of your finished projects. For those of you that did (Thank you again!), it made Sarah and I crazy excited. Since that part of the sew-along was so much fun for us, we though we might try again, but with a bit more oomph.
Sarah and I decided that we would host a competition with prizes for the best lingerie sewn! Don't worry, you don't have to pose in your lingerie, pictures of the garments by themselves are great! Sarah and I didn't pose in our lingerie either :)

If you didn't sew all three pieces, don't worry about that either, a prize will be awarded for each category, so Bras, Corsets, and Panties will each have their own prize.
The following prizes will be offered to the projects with the most votes:

Pin-Up Bra Corselet - $40 Gift Certificate from Mrs. Depew Vintage
Pin-Up Corset /Garter Belt - $40 Gift Certificate from Mrs. Depew Vintage
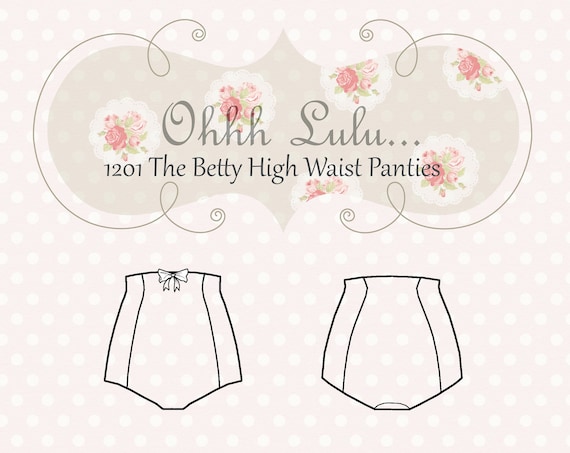
Betty High Waist Panties -  $25 Gift Certificate from Ohhh Lulu Lingerie and Apparel

Once all of the entries have been submitted, we'll post them on A Few Threads Loose and you'll all be able to vote for which ones you like best. Want to win? Send your friends over here to vote for you. Anyone can vote!

Here's how to do it. Each entry needs to be posted on Craftsy to qualify. (If you don't have a Craftsy account, it's free to sign up and takes about a minute!).

To post your project, click on one of the links below to be taken to the about page for that pattern.
Pin-Up Bra Corselet
Pin Up Corset/ Garter Belt
Betty High Waist Panties

On the right side of the page you'll see the "+ Add a Finished Project" button.


Click on that and follow the quick process to post your bra, corset, panties, or all three. Sarah and I will get email notifications from Craftsy when your projects have been posted and we'll keep track of them for you.

You'll have until February 18th (New Extended Deadline!) to post your entries to Craftsy.  Voting will start on February 19th and we'll count the votes and announce the winner on February 26th.

Pin Up Bra Pattern by Mrs. Depew Vintage
Corset / Garter Belt Pattern by Mrs. Depew Vintage
Betty High Waist Panties Pattern by Ohhh Lulu
For those of you who wanted to join in on the sew-along but didn't have time, now is your chance!  You should have time to sew up something in the next 3 weeks and enter it in the competition if you'd still like to participate.

It really does delight Sarah and I to see your finished projects so dust off those undies and fly them with pride!

Art by Joyce Balentine
Update: Here is a button that you can add to your blog if you're participating!


Grab button for Ooh La La Competition

Tuesday, January 15, 2013

Swim Trunks for Boys... or Everyone?


Today for you, dear readers, I have a 1940's French knitting pattern for boy's swim trunks. I know, there are very few 11 year old boys would easily be wrangled into a pair of these but I thought, "Hey, aren't these just amusing?" and "What else could you use this pattern for?"

The diagram below from the pattern gives the measurements in centimeters, so could one conceivably fiddle with them to scale the pattern for a larger man, or a very bold lady?


What say you?

If you would like to download the whole French pattern, click here.

Or you can check out this digital download for a 1940's full size trunks pattern for men, from FabForties.


And since my thought progression on this topic has naturally taken me to Bond (I'm weak, I know), here is a picture of the man himself, rocking a similar fashion.


Oh, sweet Jesus.

Thursday, January 10, 2013

Draft at Home Patterns: A How - To

A draft-at-home blouse pattern like the ones available in our shop.

Today I have an interesting tutorial on draft at home patterns for you. One of the questions I get the most often about these patterns from my shop is, "I thought I understood how these patterns work but now that I look at the files you've sent, I just don't see how the little pattern becomes a bigger one."

This question is referring to the draft-at-home patterns that use a ruler to scale a tiny pattern up to a full-sized one, similar to the Lutterloh system.

This is a concept much easier to explain with pictures so should you decide to try one of these patterns, to make your lives easier I have put together a tutorial for you.

What you will need:
Your bust measurement,
Paper ( I use a roll of tracing paper that is 36" wide),
A thumb tack or push pin,
A small piece of cardboard,
A pencil,
A ruler or yardstick,
And tape.

A French curve will also come in handy but isn't a requirement.


First, you'll want to print out everything. You should have your pattern and your measuring bands printed and ready to go. (Make sure that you print your measuring bands at 100% scale.) Once you've taped your measuring band pages together, you need to choose the measuring band that is closest to your bust measurement.  If you're working with a pattern marked with an H, use your hip measurement.

These patterns come from a 1930s French system so it uses centimeters. (Here is a link to an easy conversion calculator.)

For this example I'm using my bust measurement, which is about 36" and I have chosen to use the largest size closest to that, 92 cm. If you're off by a fraction, round up to the nearest size.
Once you've chosen your measuring band, cut it out. Make sure that you cut close to the edge of the outer lines of the band. This will help make your pattern as accurate as possible later.

The end of my measuring band, trimmed close to the edge on the size I plan on using.

Next tape your piece of cardboard to the edge of your table, making sure you have plenty of room on both sides for you to draft later. Think about how large your pattern pieces might be once full-sized and take that into account.

The piece of cardboard, about 2" square, is used to stick your push pin into, so you don't ruin your table.

Next you'll want to position your paper at the edge of your table, just over the cardboard piece. Then place your printed pattern centered over your cardboard. Tape it in place and use something like tape or weights to keep your drafting paper from moving round as you work.


Next you need to pin your ruler to your pattern. Start by finding the small cross on the pattern piece closest to your drafting paper.

Pierce your ruler with the push pin right at the little dot on the end of the ruler. If you're using the 92 band, put the pin through the end that says 92 on it. Then push the pin into the cross for the pattern piece you'll be drafting first. In this instance it's the one marked as 'Back'.


Now the ruler is free to swivel on the pin in any direction and you're ready to start drawing.


Grab your pencil and starting at one end of the pattern, find the first number given on the design. You can see above that the first number on the left is 27. Line up the edge of your ruler with the line above your number and then find the matching number on your ruler.


Make your mark on your paper and then move on to the next number. The X's marked are the main corners and edges of the patterns. The O's usually indicate the edge of a curve. If you find a number like 32 1/2, just estimate where it would be as there are no fractions given on the bands.


Keep moving along and mark off each number until you have a bunch of dots that roughly outline the pattern shape.
Now you get to play connect-the-dots! Using your ruler or french curve, just outline the curved and straight lines until you have a full sized fully drafted pattern piece.


The dots that outline my pattern edges, before they are connected.

A French curve comes in handy for drawing a smooth line along the curves of armholes and waistlines.

The full sized pattern piece after the dots have been connected.


Now all that's left to do is add the seam allowance. Seam allowances are usually not included in these patterns and this one is no exception.

Repeat the same process for each pattern piece, using a new piece of paper each time to draft your pattern onto. Make sure that as you draft each new pattern piece, your desired pattern piece is on the same side as your drafting paper.

Things to remember:
  • Your pattern pieces may need to be lengthened to your height requirements. For instance, trousers and skirt pattern pieces might look a bit short until you lengthen them.
  • These patterns don't have sewing instructions and were intended for at least intermediate-level sewers. However, the pattern pieces are usually laid out in their boxes in relation to how they're to be put together. 
  • These patterns also don't usually include things like facings and pocket pieces. It was assumed that the average seamstress knew how to draft these things on her own. Here is a quick and easy tutorial by Colette Patterns on drafting a facing.
  • Though this system can be pretty accurate, there are sometimes discrepancies in vintage patterns. There is also human error to take into account. Always make a muslin of these patterns before using your intended fabric to make sure the fit is right.
  • I highly recommend using tracing paper to draft these patterns. Once your pieces are drafted, it's easy to lay them out over each other and get an idea of how seams will fit together. (FYI, I buy my tracing paper by the roll here.)
  • You can find all of our draft-at-home patterns and measuring bands at Mrs. Depew Vintage.

Any questions?


Wednesday, January 9, 2013

Sew Expensive... McCalls 3977 Designer Bathing Suit


For today's Sew Expensive I have for you a very interesting swimsuit pattern. Granted, it sold a few months ago and I'm just now getting around to posting it but nevertheless, it's expensive and quite interesting! 

The pattern in question is McCall's 3977 from 1956 and it was designed for McCall's by Emilio Pucci. Now we all know that bathing suit patterns from this era are harder to find than most, and when you do find them, they can range from $40 to $100.

Would you like to know what this multicolored gem sold for on Ebay?


An amazing $222.50.
So, what are some of the factors that make this one more valuable than most? First we have the cute sweetheart neckline paired with a skirted bottom and pointed midriff. This combination of details paired with the color blocking effect makes for a very original bathing suit. Then you have the designer pattern factor, always guaranteed to add to it's value and the fact that this one was unused and still in its factory folds.
And of course, there's the demand. Patterns like these are always in demand.

But what do you think of this swimsuit? Of the pattern? Could you conceive of spending over $200 for one of these, even if it has never been used?

Personally, I can't. Even if it was done in different colors I still can't get past the fact that the bathing suit looks like a figure skating outfit.


So sexy.

Friday, January 4, 2013

Lingerie in Profile: 1950's Cut Out Brassiere


For today's post I wanted to share with you a vintage bra from Paris that I recently sold in my shop. It was one of the most unique and rare bras I have ever come across and I thought you might like to see some of the construction details that were used in it's making.


This is the only cut-out bra that I have ever seen outside of a Fredrick's of Hollywood catalog, and it's definitely more rare to find a vintage 1950's one. It still had it's original store tags and it was in perfect condition.

Firstly, the bra is lace that has been backed with a soft silk netting and then attached to a silk band, with silk ribbon straps.


The silk ribbon straps ended at the back with a small 2" length of more buttonhole elastic for comfort. (Not that one would be wearing a bra like this all day!)