And we're back with the next installment of Sewing 610!
I'm sorry that our quick break lasted a bit longer than the week I was in Nebraska. The trip back was not as painful as I had expected, but I found that I still needed at least a week of sleep, tea, and Downton Abbey to recover what's left of my peace of mind and get back to work.
So today, peace of mind in place, I'm going to show you how to make spiderweb silk rosettes.
 |
| These were added as an afterthought to my first bra. |
 |
| Case in point: a gorgeous 1930's lace bra from my collection. |
Here is what you'll need:
- a ridiculously small embroidery hoop - mine is about 2 /12" in circumference.
- about 12" of 7mm or 4mm wide silk ribbon. I bought my 7mm here and am thrilled with it.
- sewing or embroidery thread in similar color to your ribbon.
- 1 sewing needle
- 1 large (size 22) chenille needle (or a really massive embroidery needle, if you have one.
- a small button
- scissors
To keep the top of your bra from getting a bit deformed during this process, it's a good idea to run a simple line of stay-stitching across the top. Then mark a small dot where you want your rosette centered.
Place your bra (or practice scrap) in your embroidery hoop, but do so loosely and gently. It doesn't need to be drum-tight for this.
Place a small button or other round object the size of your desired rosette centered over where you marked. Holding the button in place, gently stencil a circle around it using a pencil or tailor's chalk.
Next, thread your small needle and using a straight stitch, sew 5 evenly spaced spokes radiating out from the center.
Thread your large needle with the ribbon, knot one end, and bring the needle up through the fabric very close to the center.
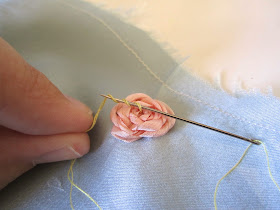
Give your needle a twist to curl your ribbon a bit, then draw the needle carefully first over, then under each spoke, repeating and twisting the ribbon as necessary.
Tip: to avoid piercing or snagging your fabric, use the dull end of the needle to do the threading, keeping the pointed end towards your hand.
Finally, when your rosette is as full as you wish (you'd be surprised how much ribbon you can jam into those spokes) simply bring your ribbon and needle through to the other side (piercing slightly in and under your rosette to hide it), gently knot your ribbon, and you're done!
If you wish to have a contrasting bit of stamen or pollen in the center of your rosette, you can do the following:
Bring a yellow thread, knotted at the end, up through the wrong side of your fabric and into the center of your rosette.
 |
| Moving on to the rosette on my bra now... |
 |
| Pardon my nails, I'm in need of a bit of a spa day. |
Then simply knot off your thread on the wrong side and voila! A lovely little silk rosette!
I'll be back with more Sewing #610 when my much awaited, and much belated silk fabric comes in the mail. The fabric that I had chosen to line this fine little beauty with turned out to have snags and runs galore (a fit of epic proportion and duration was thrown) so I'm in holding pattern mode at the moment.
Happy sewing,


Wow! Thank you!!!
ReplyDeleteGorgeous detail!
ReplyDeleteI love this tutorial! I just finished a silk pj set for my mom and I've been looking for a cute way to tell the front of the tap shorts from the back. The rosette would be perfect at the center front waistband.
ReplyDeleteThanks for the inspiration.
Thank you. So pretty and so simple the way you have broken it down.
ReplyDeleteSo beautiful.. thank you for sharing!
ReplyDeleteThis is gorgeous. I hope I find something to have an excuse to make one (or twenty) Thank you for sharing it!
ReplyDeleteThis comment has been removed by a blog administrator.
ReplyDeleteI'm going to try this! I love how you broke down each step and make it look so simple. I'm getting back into sewing and knitting and you will be able to follow my adventures at isewiknit.blogspot.com. Think this would look pretty on the vintage lingerie pattern you have.
ReplyDeleteAnna, this is so incredibly gorgeous! I suddenly want silk rosettes on everything I make.
ReplyDeleteOhhhhh, so pretty! I really must try this --- thanks for the wonderful tutorial :D
ReplyDeleteYes, I too have dusted off my sewing machine and have fabric drying on the line as I write this! you would have thought the styling would have been updated by now, the same as it was in the 80s!
ReplyDeleteSuch a lovely little flower!
ReplyDeleteThank you for sharing the how-to!