The whole reason I started this blog was to help and inspire my fellow seamstresses. When I first started sewing I stumbled across some other popular sewing blogs and they inspired me like crazy, and often provided really useful tips that have made me a better seamstress. Since my following is still rather conservative in size I've been unsure that I've met my goal to help or inspire, until today.
I got an email today from Airy:
"Hi,
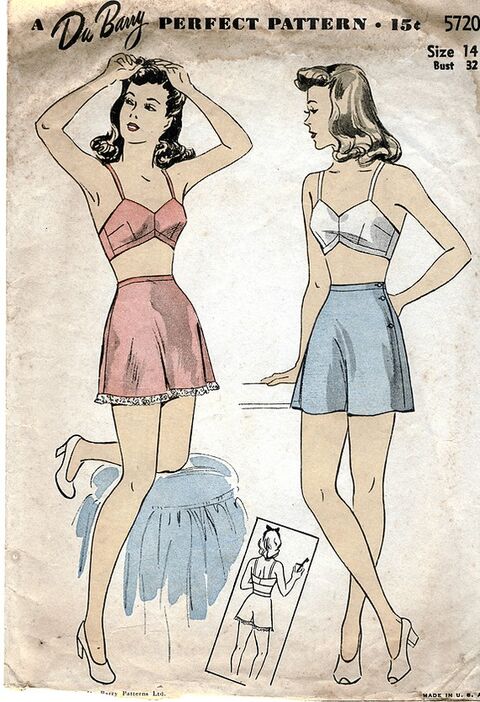
I found your blog while looking up this pattern. I was thinking of bidding for it on eBay, but then I saw in your description that it had some strange pieces. One of my projects is trying to make my own patterns for garments for myself (I've succeeded in a basic bra, but I'm having some problems with the panties pattern). I was wondering if I could get a picture of the pattern pieces for this Du Barry pattern (there's usually pictures of the pieces on the back or on the instructions). This is just for me to get a general idea of the shape of the pattern pieces. (I don't want pictures of your panties or anything like that).
Thanks,
Airy"
Thursday, February 17, 2011
Sunday, February 13, 2011
The Slip That Just Won't Die... Finally.
This poor slip has been waiting half done on my dress form for a couple months now. My mom included it in her last sewing loot care package so that I could make a pattern from it. We both considered it too far gone for anything else.
Until an idea just came out of nowhere. I was looking it over and became aware of just how many times this little slip had been patched and mended. Someone had carefully extended the life of the slip long after most people would have tossed it out. Mom lives in rural Nebraska and finds lots of treasures at farm auctions and thrift shops... I have this picture in my mind of a young farmer's wife saving up to buy a lovely cream satin fabric, sewing the slip from the latest mail order pattern, proudly wearing it, and carefully mending it to make it last several years.
So I posed myself a question, "How far gone does something have to be before it's not worth saving?" And thus, the slip that just won't die was born.
The points where the straps joined at both front and back were all mended with great triangle patches, some times more than once. There were little patches in the front and back at about hip level that had been mended with little art nouveau rose-shaped patches.
Friday, February 11, 2011
Simplicity 2076
I just wanted to share a pattern from my collection. This 1930s pattern reminds me of the safari style that's always flitting back in and out of style. Could I make this contemporary, do you think?
The description reads: Dress and Bolero. The skirt with an inverted pleat at center front joins the blouse at the waistline. The gathered sleeves can be short and linked or full length. The simple bolero is made with long sleeves. Patch pockets trim the dress and bolero.
I'm going through my collection (massive) and I'll be re-opening my etsy shop soon to 'recirculate' some of my stash. Perhaps I'll make this one up and add it to the sale pile.
Soon to come: A very long post on the slip that just won't die, pictures of the shirt that I sewed for Mike (finished, but good luck wrangling a man for pictures) and maybe even another lingerie project.
Some things to check out:
This auction has been a real pleasure to follow. This is the stash of the century of 36 AMAZING patterns that are (quite rightfully) climbing to a fortune.
And always good for a giggle, Clothed Minds is a short, funny glimpse into what those ladies in the pattern illustrations are really thinking.
![]() |
| Image from Clothed Minds Blog. |
Labels:
blogs,
Projects,
vintage patterns
Tuesday, February 8, 2011
My design wall.
Do you have a particular spot in your sewing space for inspiration? Before I made my design wall, that space was my computer, but like I don't already spend enough time online.
Using a bulletin board that I covered in fabric and painted, I strung some ribbon and used some mini clothes pins to line up and display my fabric stash catalog.
The stash catalog was a freebie I got to download long ago from Quilting Arts. Here's the link to the free pdf download for these cute little cards.
Where do you get your design inspiration from? Do you have a fabric story board? What is your sewing room like? Soon I'll be posting pictures of my own space but first I have to clean up the various piles of sewing detritus all over the place.
Labels:
design inspiration,
fabric,
sewing space
Monday, February 7, 2011
Wherein I am generally miserable.
Last night I was so proud of myself. I had just put the finishing touches on Mike's shirt. All I needed was to buy some buttons and make button-holes. I even started plotting how to embroider his initials on the cuff. Then he tried it on and said bashfully to me, "Sweetheart, I hate to be an ass because you worked so hard and this shirt is great, but I think the sleeve is backwards."
Well, it was all I could do not to burst into tears. My perfect top stitching! My hand stitched vent placket! My lovely bias taped seams! Most of this must be undone or thrown away altogether. I'm thanking and cursing my lucky stars that I always order a 1/2 yard extra of my fabric in case I make just such a mistake but this is the first time I've ever had to use it! I was tempted to throw it away and be done with the ridiculous baggage, but here I am, blogging about how I'm going to make the sleeve properly this time.I'm going to have to cut and sew a completely new sleeve, placket and cuff. Blast!
Here are a few tips I have gleamed from this nasty experience:
1. The second that you cut out the sleeves, use chalk to mark right/ left sleeve, which side the vent placket will be sewn, any button holes and pleats of course, and if your fabric has no wrong side, designate one. (Tip courtesy of Mom, who once made the same mistake.)
2. Take a good look at a shirt already made. Note how the sleeve is shaped, where seams rest, placket placement etc and compare it to your pattern. I drew myself a diagram for future reference.
3. Have a nice bottle of wine ready to go to calm yourself but don't drink too much of it or you'll just end up jacking up the project in some way I haven't thought of yet.
Cheers.
![]() |
| Burda 7767 |
Here are a few tips I have gleamed from this nasty experience:
1. The second that you cut out the sleeves, use chalk to mark right/ left sleeve, which side the vent placket will be sewn, any button holes and pleats of course, and if your fabric has no wrong side, designate one. (Tip courtesy of Mom, who once made the same mistake.)
2. Take a good look at a shirt already made. Note how the sleeve is shaped, where seams rest, placket placement etc and compare it to your pattern. I drew myself a diagram for future reference.
3. Have a nice bottle of wine ready to go to calm yourself but don't drink too much of it or you'll just end up jacking up the project in some way I haven't thought of yet.
Cheers.
Labels:
booze.,
burda 7767,
Projects,
sewing,
shirts
Thursday, February 3, 2011
I was bad... I bought fabric.
Today I went to a thrift shop and stumbled on a great stash of recently donated fabric. Bad Anna. I think someone was cleaning out their stash, or liquidating the estate of an older relative because these were pieces I would never have gotten rid of willingly. Of course I payed more for it here in Norway than I ever would have in the U.S. because the Norwegian-run Fretex (a.k.a. Red Cross) is corrupt and overpriced.
But never mind that, lookit what I got!
What am I going to do with over 4 1/2 yards of vintage rayon jersey?
What can't I do with 4 1/2 yards of rayon jersey!
But never mind that, lookit what I got!
What am I going to do with over 4 1/2 yards of vintage rayon jersey?
What can't I do with 4 1/2 yards of rayon jersey!
Labels:
fabric,
Projects,
sewing,
shirts,
strong man,
thrift shop
Wednesday, February 2, 2011
Wherein I make a hat.
I made this little pillbox hat shortly before leaving for vacation and had no time for posting.
I used the following video tutorial sponsored by the lovely folks at Threadbanger. If you have a bit of felt or thick cotton flannel laying about and want a fun, charming 1 hour project, this is for you!
Subscribe to:
Posts (Atom)


